Sketching out a tatting pattern

blue_1

Tatting is a funny one. Really, I should be designing my own patterns by now. I am a designer, after all – and one that happens to love repeat patterns too. That said, I often think tatting for me is like smoking for other people. I need a quick fix, there and then. Something to calm me down, occupy my brain, keep my fingers quiet.

There’s also the fact that I like to see a finished ‘thing’ at the end of it. Something I can look at and see as complete – maybe use it, maybe not, but know that I’ve started and finished something. Like a lot of people who work with computers, the work I do in my day job may change. Things aren’t ever completely ‘finished’ with the work that I do. Or at least rarely. Things gets signed off—but before you’ve had time to acknowledge it, it’s on to the text thing.

Which means that I like tatting other people’s patterns. You can choose one you like, learn it, know that it’ll look good at the end. That someone has worked out the stitch count, fixed all the niggles. A quick win. No stress. Ok – some might be trickier than others, but on the whole you’ll probably end up with something passable.

white sketch

After making the beaded wreaths (I made five in total!) I had spare thread on my shuttles. This time I forced myself to try something out.  To be honest, the main reason was that I’d seen some beautiful forget-me-nots at Chartwell and I love their tiny bright yellow middles with the blue petals (not grand flowers, but I really like them). I also keep thinking of simple daisies.  And sunshine.

As the beaded wreaths were flower based, I was wondering if I could make something that would have a yellow centre (in theory) and a blue outside. So above is my sketch. I actually don’t have any yellow thread. I should have an order going out in the post on monday!

It’s not the most original design, I do know that. (The central ring with smaller rings is relatively well established). But I worked on the stitch count – decided to make it less leafy and to keep it simple this time around.

edging

edging 4

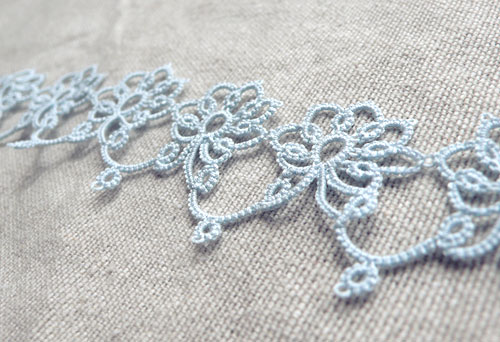
When I loaded up these shuttles I’d sort of promised that I’d keep evolving the pattern, but the addictive part of my brain kicked in and so I carried on from where I was and stuck with that as a pattern. I’ve not worked on an edging pattern before and it feels oddly different. Its a tiny bit clumsy as it gets longer, but quite satisfying too. You can very easily see the progress you’ve made.

edging 2

This is size 80 DMC thread, so it’s quite like a length of lace. Very flimsy – would make a pretty bracelet but it’s just not really thick enough. I like that it can stand up on it’s own though. Made for some nice photos while I was avoiding work…

edging 3


Talking of which… I’d better get on with it :-/

Hope you’re having nice weekends!


Monkeys, crochet, tatting, sewing, triumph and failure

Finished monkey

Yes, this post has something for everyone. Or at least something for everyone who likes a bit of craft – otherwise, look away now.

I was of course making a pig, last time I posted. It’s still at the head stage, because the Ipad refuses to display the second page of the pattern, and I’ve not really been sitting at my other mac, which displays it perfectly. I will finish it, but over Easter as I was away visiting family, I grabbed two balls of yarn and a hook and decided I’d try out some yarn I bought for monkey making a while back.

Relaxing
(Look at her there – relaxing mid-photoshoot! Honestly. It was quite hard to get her to pay any attentional at all.)

The yarn was £2.00 a ball and is Rowan hand knit cotton. I must admit, I don’t love it for this kind of thing, I’ve decided. Two main reasons:
• I crochet really tightly anyway (which is actually very good for making toys) but it makes some yarns tough on the fingers – and this is one of them.
• The stitch definition is a bit too good! Its an odd negative, I know, but I think sometimes the fact it shouts ‘I’ve been crocheted!’ can really get in the way of the character of the toy. Something a little fuzzier is probably better.
While I was away, I made all the boring no-brainer bits: ears, mouth, hands, feet and I started on the rest of the head. I finished the head in the week and today I forced myself to make all the limbs and sew it together. Sewing of course, being the worst job of all.

Usually I put scarves on my monkeys, but today, with sore fingers, I couldn’t face crocheting anything else. Out of the blue I decided to make a dress instead. The monkey is actually an odd colour in real life, and just as I was about to chop up some linen, my head said ‘umm, you’re doing this in a rush, with no idea what you’re doing. Use something you don’t care about’. For once I listened and used a bit of old sheet instead. I must admit, I’ve done a dreadful job on the dress sewing! It’s appalling – and worse – the monkey is trapped inside. I had to sew her in, which is something I really don’t like (it’s sloppy, I think). Having said that – Look at her! She’s hilarious. As I sat down to sew her in, I spotted the crochet flower – it’s been knocking about on my desk for ages – I crocheted it in tatting thread a while back.

flower

I makes a big difference I think. Without it, she looks like she’s in very drab school uniform. Having said all that, I quite like the overall effect, and so I’m going to ponder on it all and probably remake the dress, but better. I did a quick google search before hand incidentally, and found this tutorial. It’s not brilliant, but gave me enough confidence to have a go. I didn’t pin anything or measure anything… it shows. Next time.

If you wanted to crochet your own monkey, I used this pattern again, and just personalised it a bit as I went. So that’s the crochet – and the sort of triumph, on to the tatting / sewing / failure next.

Before Easter I thought I would try making a ‘lunch bag’ style bag, to put tatting on. Most of the tutorials I’ve seen have all been for bags in one colour, but I wanted side panels on mine.

side panel

Only thing is, I also lined it, and by the time I’d finished, it doesn’t really fold over properly, which is really annoying. I think it’s all too small for the thickness of the fabric.

fold

I know it needs a button – but even with it, it’s a very clumsy looking thing – so back to the drawing board on that one.

Also, I’ve been trying out using tatting for a brooch – and I’m not keen on that either!
brooch

This is it 3/4 done – but I’m still thinking about whether to finish it or take it apart. I made the edging in the week (my own pattern, for once) – but it’s really there to hide the fact the circle isn’t perfect. So… how do people make and hem circular brooches? Actually, even as I typed that I think I probably know the answer to that one. They’re better at sewing than me 🙂

Never mind. You don’t know these things till you try ’em.

In other more exciting news – I’m learning to knit! I asked specifically for no chocolate this Easter, and so instead of an egg, my mum gave me a massive ball of practise yarn, a pair of needles and some of her time in teaching me. She’s a brilliant knitter, but doesn’t enjoy it, so it was very sweet of her to put herself through it. What a lovely present. I’ve been forcing myself to get that monkey finished all week, so I can get on with trying to knit a scarf! I’ve got the basics of knit and perl, and I can just about cast on and off (with a bit of prompting). Needless to say I have grand ambitions but like all these things, *trying* to take it one step at a time.

Phew.

I tat for process

I read a piece on Make and Meaning a little while ago, talking about crafters making things because they enjoy the process, or making things because they want the product. It’s popped into my head quite a bit since I read it, and I have to say, with crochet it’s probably 50/50 – I like the process, but I like having the finished product so I can give it to people.

With tatting, I think it’s all about the process. It’s so great learning something new – I taught myself split rings last year on the train on the way to work and was so excited I almost had to tell the stranger sitting next to me. Last weekend I finally took a look at ‘onion rings‘ (really easy – as it goes) but it’s such a joy when you get it all to work. I love the action of tatting, and the size of it. I love that you can chuck it in your bag and take it anywhere, you can tat at the busstop or fill a shuttle even when you don’t get a seat on a commuter train.

The thing with being all process is that once you understand the process you don’t mind if you don’t finish the product. I’ve got a pile of small tatted things (bad light at the moment – will take a photo at some point) that could be made into a bigger more finished ‘thing’ but it’s feels done now, I know it did or didn’t work so I’ve moved on to the next thing.

tatting

This is a Mary Konior pattern I tried at the weekend, after I’d been looking into ‘onion rings’. It doesn’t actually call for them, but you can use rings for the first two in each motif and finish it off with a chain around the outside. Because I’m an idiot I messed up the third motif, in all kinds of ways. I kind of tatted it backwards, which gave me a twisted picot when i joined two rings and then in a fit of madness I created a whole other ring I didn’t even need. I’ve managed to open closed rings in the past but i couldn’t open this one and decided to quit while I was ahead. But what now? Should i remake, or move on to something new. For once, I’m torn with this. I kind of feel like I should remake it actually. It’s really fun to tat, partly because it’s such a pain in the bum. Process, see. I didn’t even like the pattern that much when I started.