Body of Evidence

New body!

…aaaaaaand relax. The little piggy has a brand new body, and I think we can safely say, everyone is much happier. Or at least I am. Thank you for your comments on my last post. You were right. As much as it would’ve been great for everyone to say it was fine, it wasn’t, and I felt his body really didn’t do his head justice. There’s nothing more unsatisfying than a half done pig, is there?

sketch

This was the idea, before I got started. (I sketched it in a meeting. Bad habit.) I think it wasn’t a bad likeness in the end. No belly button of course, but I do like the two wooden buttons, I think they add a bit more interest. I still love this yarn – the Simply Recycled cotton. It’s really soft and the colours are so nice and muted.

side

And here we are from the side…

tail

And here’s the other side, with his tail peeking out. Phew. All done. Believe it or not, as I have more yarn, I’m tempted to make another one.

A mixed bag (may not contain bags)

Image

This little piggy has been a bit frustrating. I’m not sure what to do with him/her, but I think it’s not over yet. This is body number two – I actually finished the whole thing once, lived with it for a week or two and then took it apart. This is the body as written in the pattern, but I think it’s a bit messy. Too many decreases, which just don’t look good. It’s a shame as the head is such a great shape and so nicely written up, but I just think the body doesn’t do it justice. It also doesn’t suit a scarf – or anything else I can think of as yet – to distract you from the not-very nice shape. Will think on. Any suggestions appreciated! Poor little piggy!

Image

I’m a fan of the yarn though – it’s lovely! It’s the Sidar Simply Recycled, and is lovely and soft. The colours are also really nice, quite muted – a bit more natural looking. I’d definitely use it for making toys again. This little chap is much bigger than the last one.

Image

This is an experiment, made the other week. It’s tatted in size 40 thread, and is actually the pattern for a bracelet. The thread is much thicker than I would normally use – but probably a bit more of an appropriate size for jewellery – that said, as a bracelet I think it would drive you nuts! I love the idea of tatted daisy chains, but maybe just not this one. Rather than waste it I made yet another lavender bag. (I think I underfilled it too – after all my months of overfilling I’ve tipped back too far in the other direction!)

Image

But look at this – it’s knitting! A waffle scarf (ravelry link), and it seems to be going ok (she says, touching wood, with crossed fingers). Now I’ve got the hang of it, I’m really enjoying it. It’s a very simple pattern of course, but nice for a beginner, and a great TV project. I’ve already planned my next project – bought the pattern and the yarn, but I’m going to be good and finish this first. Very exciting!

Brilliant things mums give kids

There’s no pictures in this post I’m afraid, but I hope you’ll read it anyway – especially if you’re a mum.

I was tatting on the train on the way home from work tonight, thinking about things to make. My mind wondered to hair accessories – and then to a hairslide my mum made for me when I was little. What a hairslide! I loved it.

As a child I always had my hair in a bob. It was between chin and shoulder length, and quite ‘swishy’ – I’ve got very thick hair. One day my mum made me a special hairslide – I’m not sure what prompted that, now I think about it. It was platted in green and white cord across the top, stitched on to a flat metal hair slide, but with long pieces of cord that dangled into my hair, with beads on the end. Wait – I’ll draw it. Ignore the no pictures thing.

See what I mean? I can still feel it in my hair now. All dangly and brilliant. I thought it was the best thing ever. It WAS the best thing ever. It’s not the only thing my mum has ever made me of course.

She also made me dresses (when I was really little) an aran jumper (which she hated knitting, but was very well done), cakes and biscuits, a hot water bottle cover, cushions, some beautiful embroideries and lots of other things. (She also instilled the deep love of a good book).

Of course the very best thing she gave me, was her time.

We both enjoy crafty stuff, but mostly different crafty stuff. She does the most incredible embroidery, cross stitch, Hardanger and she’s really practical – so if there’s a need for a *thing* in fabric, she’ll figure a way to make it. Boxes, decorations, aprons, peg bags, iPod cases, that kind of thing. I’m not at all the same. I think I’m still working out what I like doing – tatting, for sure – and I’m liking learning to knit and use my sewing machine.

Growing up with a major part of my youth in the 80s, there was a real rejection of craft. Somehow, my family still had hobbies. I just grew up thinking that there was more to life than TV. Now I’m older, I can really appreciate what a gift that is to give to your children. I’m rarely bored – when I listen to friends who suddenly find them selves alone on a Saturday, or stuck in on a weeknight and forced to watch TV, I think how nice a spare evening to yourself sounds — a chance to *do* something! (Not to watch TV.)

So, Mum – thank you. Thank you for all the things you’ve made me, all the things I’ve made with your help, and all the things I’m thinking of making.


And apologies – for the lack of pictorial evidence, I just felt like posting this tonight.

Monkeys, crochet, tatting, sewing, triumph and failure

Finished monkey

Yes, this post has something for everyone. Or at least something for everyone who likes a bit of craft – otherwise, look away now.

I was of course making a pig, last time I posted. It’s still at the head stage, because the Ipad refuses to display the second page of the pattern, and I’ve not really been sitting at my other mac, which displays it perfectly. I will finish it, but over Easter as I was away visiting family, I grabbed two balls of yarn and a hook and decided I’d try out some yarn I bought for monkey making a while back.

Relaxing
(Look at her there – relaxing mid-photoshoot! Honestly. It was quite hard to get her to pay any attentional at all.)

The yarn was £2.00 a ball and is Rowan hand knit cotton. I must admit, I don’t love it for this kind of thing, I’ve decided. Two main reasons:
• I crochet really tightly anyway (which is actually very good for making toys) but it makes some yarns tough on the fingers – and this is one of them.
• The stitch definition is a bit too good! Its an odd negative, I know, but I think sometimes the fact it shouts ‘I’ve been crocheted!’ can really get in the way of the character of the toy. Something a little fuzzier is probably better.
While I was away, I made all the boring no-brainer bits: ears, mouth, hands, feet and I started on the rest of the head. I finished the head in the week and today I forced myself to make all the limbs and sew it together. Sewing of course, being the worst job of all.

Usually I put scarves on my monkeys, but today, with sore fingers, I couldn’t face crocheting anything else. Out of the blue I decided to make a dress instead. The monkey is actually an odd colour in real life, and just as I was about to chop up some linen, my head said ‘umm, you’re doing this in a rush, with no idea what you’re doing. Use something you don’t care about’. For once I listened and used a bit of old sheet instead. I must admit, I’ve done a dreadful job on the dress sewing! It’s appalling – and worse – the monkey is trapped inside. I had to sew her in, which is something I really don’t like (it’s sloppy, I think). Having said that – Look at her! She’s hilarious. As I sat down to sew her in, I spotted the crochet flower – it’s been knocking about on my desk for ages – I crocheted it in tatting thread a while back.

flower

I makes a big difference I think. Without it, she looks like she’s in very drab school uniform. Having said all that, I quite like the overall effect, and so I’m going to ponder on it all and probably remake the dress, but better. I did a quick google search before hand incidentally, and found this tutorial. It’s not brilliant, but gave me enough confidence to have a go. I didn’t pin anything or measure anything… it shows. Next time.

If you wanted to crochet your own monkey, I used this pattern again, and just personalised it a bit as I went. So that’s the crochet – and the sort of triumph, on to the tatting / sewing / failure next.

Before Easter I thought I would try making a ‘lunch bag’ style bag, to put tatting on. Most of the tutorials I’ve seen have all been for bags in one colour, but I wanted side panels on mine.

side panel

Only thing is, I also lined it, and by the time I’d finished, it doesn’t really fold over properly, which is really annoying. I think it’s all too small for the thickness of the fabric.

fold

I know it needs a button – but even with it, it’s a very clumsy looking thing – so back to the drawing board on that one.

Also, I’ve been trying out using tatting for a brooch – and I’m not keen on that either!
brooch

This is it 3/4 done – but I’m still thinking about whether to finish it or take it apart. I made the edging in the week (my own pattern, for once) – but it’s really there to hide the fact the circle isn’t perfect. So… how do people make and hem circular brooches? Actually, even as I typed that I think I probably know the answer to that one. They’re better at sewing than me 🙂

Never mind. You don’t know these things till you try ’em.

In other more exciting news – I’m learning to knit! I asked specifically for no chocolate this Easter, and so instead of an egg, my mum gave me a massive ball of practise yarn, a pair of needles and some of her time in teaching me. She’s a brilliant knitter, but doesn’t enjoy it, so it was very sweet of her to put herself through it. What a lovely present. I’ve been forcing myself to get that monkey finished all week, so I can get on with trying to knit a scarf! I’ve got the basics of knit and perl, and I can just about cast on and off (with a bit of prompting). Needless to say I have grand ambitions but like all these things, *trying* to take it one step at a time.

Phew.

Doing something (else) with my tatting

Bag close up
(side note – clicking any of these photos will make ’em bigger.)

Last year, when I decided I was producing a lot of tatting and it was about time to do something with it, I made some lavender bags. A complete sewing novice I thought they’d be a good place to start. Actually, they were… Tiny practice pieces, all a bit wonky, none of them with the motif actually in the middle. Luckily lavender smells lovely and if you squint a bit the wonkiness fades, so they do the job quite nicely.

After my quilting adventures, and an earlier attempt at a drawstring bag, I decided it was time to try something new with my tatting. Still all straight lines of course, but, you know – no point rushing in to curves!

Drawstring bag

I’m quite pleased with this. Made a few mistakes but learnt a bit too. I did have to unpick the sewing that holds in the drawstring about 5 times – it’s actually very tricky at that size on the machine. Next time I might do it by hand. I’ll also plan to sew on the tatting in advance rather than in the middle of everything, because I got so impatient with it!

I mentioned in my previous post that I finally sewed in the ends of a few pieces of tatting I’d had sitting about, including the Mary Konior pattern made in Valdini thread . I must admit, I really wasn’t that keen on the colours of it at all, but after blocking and sewing, I’ve changed my mind.

valdini bag

In the end, I just wanted to use it for something – anything really, and so I bashed out another lavender bag. I think I overstuff them usually, but this time I was a bit more sparing, and it makes it look a lot more professional! I think the linen knocks a bit of the garishness out of the colours – generally mutes it a bit. Now I’ve actually gone from not liking it much at all, to loving it!

So, all good. Room for improvement, but ok for a Sunday afternoon.

Back to the tatting chat

Finished

What with all the quilt euphoria, you might think I’ve not been tatting, but I’m still clicking along in the background. When I can get a seat on the train I always tat – it’s a bit like meditation for me. Stops me getting angry that the trains are always late, and gives me time to mull over the day ahead or just gone. Sadly, the above Storm Trooper refused to sew in the ends, and so I had to finish this off alone. The pattern is from here, and I must admit, does benefit from some beads or other embellishment. It’s a bit plain as it is. (The Storm Trooper helps.) I’m tempted to make it in green though, with red beads, as it does make a nice little holly wreath. Perhaps nearer Christmas.

pile

While we’re talking sewing in ends, this is the pile I’ve forced myself to deal with this week. The beaded one on the right I only made a week or so ago, but the others have been lurking about for ages. In the end, I left them on the kitchen table, and forced myself to do a tiny bit of sewing when I was waiting for a kettle to boil or something to cook. Bit by bit it wasn’t too bad. As a person who crochets, I’m always reading about the chore of sewing in crochet threads – but seriously! Wait till you have to deal with size 100 tatting thread!

half done

This is 4/5’s of a Susanne Schwenke snowflake. I love this pattern when it’s complete – while it’s a single section on repeat, theres something about it that feels a bit erratic, reminds me of sparks flying off a sparkler.To be honest there’s absolutely no way you’d see that from the above, but trust me, it’s nice. Anyway, This was the first attempt, but I wasn’t thrilled with it. It’s a tricksy pattern, and there’s the tiniest bit of bloc tatting in there, which I’ve never done before.

block tatting

That’s me learning block tatting. It’s almost like you tat a chain on one side of the thread, and the next chain on the opposite side. Also, I finally learnt how to make a lock join – tatters, isn’t it hard *not* to flip the thread? Seriously, it felt like I was defying the laws of physics. All that time you spend learning to flip it correctly, and suddenly you have to unlearn it. Anyway…

doneish

This is the second attempt, and I remain unimpressed. The block tatting in it is only three passes, and in size 80 thread, it just looks like a bit of a mistake. Also, I’m thinking that the 4 rings at the end of each ‘arm’ would be much better as SCMRs. As it is, they’re standard chains, attached with a normal join, and it does look a bit messy. So I’m going to tackle it again, with a few alterations… Has anyone out there made this – and if so, any thoughts?

big pig

And finally, I’m making a bigger version of the Little Piglet! I love this pattern, the shape of the head is so cute. I hope I manage to make his body live up to it.

And that’s all for now.

Except, one last thing – look at this brilliant woven bookmark made by a friend of mine! Such a great idea, and I love the thought of a bookmark created for a specific book.

First quilt: finished!

Quilt on the sofa

I’ve been itching to write this post for THREE WEEKS. Three weeks ago I finished this, but I’ve only had the chance to take a few photos today.

So the thing is, this quilt is far from perfect, but I honestly couldn’t be more pleased with it. It’s a bit wonky, the stitches aren’t always straight, but I really had a lot of fun (and frustration) making it, and I learnt a lot. Also, it’s got a lot of happy memories associated with it, dating back to a beautiful weekend last August when I bought the fabric.

Anyone with the interest in reading this (if there is anyone!) will probably know how enticing bundles of fabric are in quilt shops. I finally succumbed in Quiltessential, where the owner was so helpful and encouraging that before I knew it, I’d bought myself a bundle of fabric and a rotary cutter. She seemed pretty sure I could make something, and I thought ‘you know what? You’ll never know till you try’. Up until that point all I’d made were lavender bags, I hasten to add, and I’d never heard of a ‘fat quarter’.

Anyway, I took from last September until 3 weeks ago to cut the pieces, patchwork them, buy the backing fabric, baste it, quilt it and bind it, but I’ve done it! And really, I did the whole thing by reading tutorials and watching some videos on the internet. (Thank you internet!) I should also add, that I wasn’t working on the quilt continuously, I doesn’t take *that* long!

back strip

I’ve looked at a lot of quilts online, and noticed people adding nice details to the back, so this is the back of mine – or a bit of it. It’s got a strip of patchworked offcuts and a strip of solid fabric, which runs across the shortest length. I really like it actually, and so when I make my next one, I’ll make more of an effort with it. And yes, I’m already planning my next one.

In the end I machined the front of the binding (this is my machine), and hand stitched the back, which really didn’t take as long as I thought it would. It’s not 100% easy quilting on the Singer (I still don’t have / really know what a ‘walking foot’ is) but it’s manageable. I might not win any prizes for the evenness of my stitches, but that’s not really a problem as I wasn’t planning on entering anything!

It’s the perfect size for wrapping yourself up in on the sofa – or just staring at for a bit 🙂

quilt

So here’s the thing. If you’d like to make a quilt and you’re a bit worried about it, don’t be. It’s just sewing, and if you get it wrong, you can unpick it. Unpicking might be annoying and take some time, but nobody dies. And at the end of it, you’ve got a *thing*, you’ve learnt something, and you’ve had some fun along the way. If you don’t know anyone that quilts, and you can’t get to, or afford any lessons, make the most of what you have – the internet. People are very kind with their time, and the online tutorials I’ve found have all been brilliant.

Useful links:
For inspiration, check out some of the Flickr quilting groups, it’s how I settled on a Pinwheel quilt.

If you’re beginning with biggish squares of fabric, this video shows how to make ‘fast and easy pinwheels’ (Please note, you don’t have to be fast, I certainly wasn’t!)

And if you’re using smaller squares, then the second method here is the method I used.

I used a variety of tutorials for basting and quilting – but I’m not sure that there was any specific tutorial I would recommend over any others you might find. I used the ‘stitch in the ditch’ method of quilting, as it was the best chance I had at getting straight lines!

For the binding I used this tutorial from Crazy Mom Quilts, and next time I think I might machine bind, using this tutorial from Red Pepper Quilts.

…Phew.

Tatting shuttles for giants

Boye Shuttle

I’ve only just developed a shuttle obsession. The internet is to blame of course, because I’ve only ever seen about 2 shops with shuttles in the UK, and usually they’re the Clover ones with a pick on the end, or the Pony ones with a hook.

On the internet there are loads. Vintage, modern, plastic, wood, Bakelite, celluloid, silver, brass. With hooks, with picks or with a gentle point.

I’ve always been intrigued by the Boye shuttle, purely because it’s metal. And actually, it looks a bit brutal. It’s not an airy fairy messing about shuttle for frivolous lace. It looks like a shuttle that means business. The only thing I’ve always wondered about was the flat hook. Looks a bit… well, dangerous, obviously, but not that practical. Looks like it would catch a bit.

Anyway. We all know where this is going – I bought one. It was listed as ‘vintage’ and came with a celluloid shuttle too. To be honest, I have no idea if either of them really are vintage, (you can still buy metal Boye shuttles brand new), but the price for two was the same as the prices I’d seen for one, so it seemed like a fair enough deal.

size comparison

And here are all the types of shuttle I own. On the right is the Boye shuttle, and next to it the celluloid. Next there’s the blue Pony (like an Aero, but I have a feeling, not as good) and then there’s the good old Clover. Until now I had no idea how small the Clovers were. LOOK AT THE BOYE SHUTTLE! It’s GIGANTIC.

Usually I use the Clover as my main shuttle, and the Pony as a hook. I did try the Pony as my main shuttle for a while, but the bobbin got a bit loose and it annoyed me. Anyway.

The Boye arrived this week, and I started to use it – it was already loaded with thread, all be it rather brittle. It takes some time to get used to. I found I was holding it with my fingers further to the back, and when you pull it through a loop, you have to sort of hold it more upright than normal, to clear the hook from snagging. There were moments when I thought it was ok – having a hook attached is brilliant – and moments when it was not ok.

Hooks and picks

As expected, I didn’t love the flat hook. The rounded one catches less – and should the thread catch, it slides off. With the flat hook, if you get caught, it’s more effort to un-snag yourself.

I did like the fact it was metal though – feels more like science than craft! There’s also something nice about the bobbin tension – it’s actually pretty tight, so wont let out thread unless you really want it – which is the problem I had with the Pony.

In conclusion – I think it’s just too big for me. I love that it’s metal, and I like that it has *a* hook – I just don’t like *this* hook. Having said that, I hate to be defeated, and so I think I’ll persevere a bit longer. In between speeding along with my Clovers, of course. (Also, now I’m hankering after a small David Reed Smith wooden shuttle with a hook but I’ve notice they have flat hooks too…)

size 40

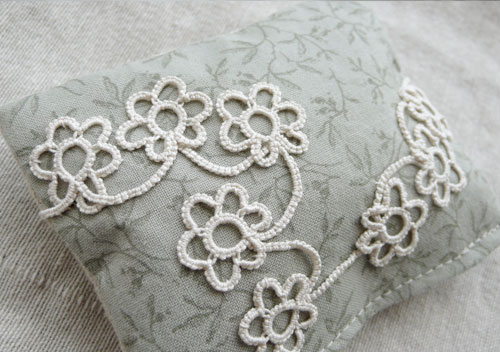
Talking of persevering and stuff that is bigger than expected – I decided to try again with the size 40 thread. Above you can see the same thing in size 80 (left) and 40 (right). I was using up some of the 40 thread I had left on a shuttle (just didn’t have enough to finish this). I’m not in love it with it. It still feels too big for me. That was a test to see if this motif would be more useful in a bigger size – and I’m not sure it would, especially if I don’t like it!

cluny school

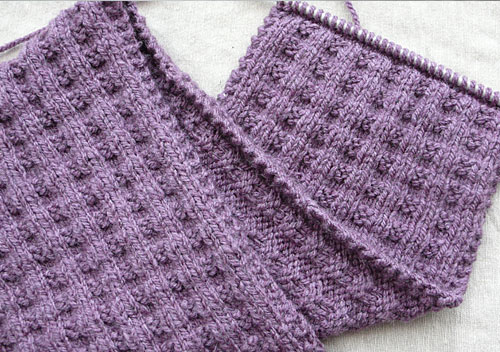
One thing I do like size 40 for, is clunys. I’ve still not really mastered them, and so I’ve given myself cluny homework. I’ve made this pattern before, but I still don’t think I’ve mastered it. The finished one was made in one pass, with a large split ring at the top. Not sure why but it never seems to come out quite the right shape – the clunys might have too few passes? (Should they be bigger?) Also the joining picots in the middle are too big and it looks really messy.

The ones in the middle of the half finished one are a much better shape. The one sticking out is a bit rubbish as I finished it on the train. If you’re a tatting commuter, this is an FYI: if you can get away with the embarrassment of getting your fingers into the right position for a cluny, then that’s awesome – but do remember they’re a lot harder to chuck in your bag unfinished when your train arrives! Packing away a half finished ring – or even a join – is ok, not so sure about a half finished leaf.

If you fancy learning clunys, there’s a bunch of links to videos and tutorials in the tatting pattern section. They’re by no means exhaustive, just ones I’ve found that have helped me.

The final episode: a new life for a baby blanket

finished

Previously, on Baby Blanket: The Occasional Crafter was in a panic. What could be the final visit to her pregnant friend before her friend gives birth was fast approaching. The Baby Blanket needed more yarn, but the forces of evil were conspiring against the Occasional Crafter and the yarn shop was failing to deliver. Could this be the end of the line for Baby Blanket? Would Occasional Crafter finally admit she should leave more time to finish things? Only the postman could tell, and you know what they’re like. Hope was fading fast…

The final Episode: A swift email was sent to Texere customer support. They didn’t see fit to reply. In desperation our ‘heroine’ orders another ball of yarn from Purple Linda, which is dispatched immediately. The Occasional Crafter wonders why she didn’t order it from there in the first place. Both balls of yarn mysteriously arrive within a day of each other, despite being ordered a week apart.

Picking up one ball, she sets to work. It’s quite a big blanket, really.

Big blanket

She adds shell stitch to the final two sides and thinks to herself ‘This yarn is a bit splitty. Even after all this time I’m not 100% sure I like it’. Banishing such pointless thoughts she wonders again about blocking. ‘Can you really wet this kind of yarn and block it? Will it dry in time? What on earth am I going to block it *on*’. She remembers the wise words of the Ravelry group and decides to iron it into submission instead. It’s not bad. She’s seen worse.

With a swift glace at the clock, the she spots its fast approaching midnight. ‘I’ll just thread this ribbon through before I go to bed, wont take long’. It’s clear at this point the Occasional Crafter has no idea what she’s talking about. It takes ages. she gets there in the end as the clock makes its weary way to 1am. It’s finished though, and if she didn’t have such a bad back, she’d probably sleep soundly.

ribbon

Saturday morning arrives, the day of the hand over. She gets up early and wanders downstairs, eyeing the weather. Its neither good nor bad — it’s not really decided yet, and standing in her pj’s she couldn’t really blame it. She takes a bunch of Baby Blanket photos in the less than perfect light and hopes for the best. She wraps the parcel, congratulating herself on the previous purchase of some pale purple tissue, matching ribbon and brown paper.

ribbon

Annnnd… there is a happy ending! I gave it to my friend (on time) who loved it. For some insane reason she’d not bought a baby blanket yet, and it was also the only handmade gift for the baby she’s received. I thought it was the law that you had to have something slightly terrible knitted or crocheted by a mad female relative? I’m happy to be a substitute on this occasion. My friend is gigantic. She’s at the stage where it looks like she’s got a perfectly round ball stuffed up her jumper. But she also looks brilliant.

A relief all round. One day I might mention to people I know that I have a blog. Only problem about that is that I wont be able to talk about them when they’re not looking 🙂


If you want to make one too, I used:
• This pattern by Alicia Paulson
• 11 balls of this yarn, Kool Kotton
• A 5.5 crochet hook

Now – just incase, You’ll need more than one ball of yarn to do the border! That was my mistake – please don’t make it yours too. Also, there seemed to be a shortage of cream Kool Kotton. No idea why but everyone was out of stock, so I ended up with white.

The pattern is super easy. It’s the ideal chatting or TV crochet project. Question is, what on earth do i make now?

Conquering my sewing machine fear

I think this has been the year of the sewing machine, for me. I inherited a Singer from an elderly neighbour, and my parents gave it a bit of love and attention (it hadn’t been used for years) and so all together, it means rather a lot to me. I’ve always been a bit nervous of sewing machines, they have a habit of running away with you, but this one is perfect!

Singer sewing machine

(All todays photos are terrible, incidentally. Camera only likes bright sunlight, and I haven’t got any.)

The machine isn’t complicated, it’s a 1930s Singer, and it only goes as fast as you want it to. Only does one stitch, and you can’t really change the tension. (Or you can try, but it doesn’t like it much). I’ve made a lot of lavender bags this year, but I also started my first patchwork quilt. It’s now at the quilting stage, and while it’s not *perfect* it’s going ok.

Quillt corner

This is a corner of the quilt sandwich. I bought the batting from a shop I think I discovered through the local Ravelry group – Thread Bear. They were so helpful – showed me the different types of batting they had, made sure I got the right amount for my rather randomly sized quilt. They were also just… kind. They didn’t go ‘oh my god, what have you DONE?!’ which is what I was expecting, because I’ve just been teaching myself as I went along, nor were they patronising, which, I would imagine would be pretty easy looking at my, errr… skills. Even the other customers were nice. So, if you need anything, I would recommend them.

I’m about half way through the quilting – it’s not easy, as I don’t have a walking foot, so you kind of have to use your whole body to get the layers through the machine – but hey, I’m getting there!

basket

I needed to check I could actually get three layers through the machine, so I tested it with this fabric basket. It’s made of patchwork from two old sheets, and some linen. I was beside myself when I finished it – it stands up! I love it! No idea what I’ll use it for, but who cares! I made it using this very easy tutorial.

Once I’d finished that, and looked at the colours, I thought I would make one last gift for someone who likes motorsport – it’s a container really to put another gift inside, using the same sheets and some cream quilting cotton I had anyway:

bag

We haven’t swapped presents yet, so he hasn’t seen it, but I hope he likes it. I used some iron-on interfacing for the bottom, as the cotton isn’t that thick. It’s lined with the grey cotton inside. I know… ridiculous, but I was pleased with it.

So, I still have the quilt to finish – need to finish the quilting itself, make the binding and then actually bind it. Having said all that, I’m starting to think about my next one! In the meantime, I’m about half way through crocheting the Tiramisu Baby Blanket for a pregnant-due-soon friend.

I should really stop writing this, and get on with it.

PS. Following the scarf conundrum, my mum liked them both, and so I gave her them both in the end!