Speedy tatted snowflakes

tatted ring

I know everyone says this every single year, but really… Where does December go? It’s there one minute and a minute later it’s the last Christmas post and too late to make anything! Every year I plan to make snowflakes to send and it’s always stressful as I leave it so late. I did manage to send out three – which I didn’t have time to photograph (two were Jon Yusoff‘s patterns). The extra one above I finished this morning.

I think I said this last year; that I would make a surplus of snowflakes over Christmas and save them to send *next* year. I might actually do that. We shall see. That said, I’m still trying to knit that baby blanket. It’s grown a little bit since I last posted, but not really enough to write home about. It’s going to be my Christmas/New year project — I should be able to work on it and chat at the same time. I hope so anyway.

So this is just a speedy post as I wont get a chance to post again before Christmas. I just wanted to say a quick thank you for the lovely comments and likes of the last year – it’s so nice to know people are out there! Thank you for your encouragement.

Hope whatever your religion you get a chance to rest and relax a bit, and if rest isn’t on the cards, then I hope you get to enjoy some family time (which I think we all know is rarely restful!) Happy holidays.


Quilt Two: done!

QuiltSo, I’ve finished my quilt at last! It was so close to being finished last Sunday night. I had about 20 cm of hand binding to finish, but needed to reload the needle, and it was just too late in the evening. I finally managed to get the time today.

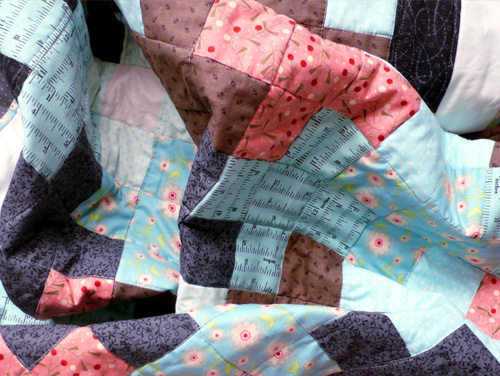
There are some spectacularly wonky lines on it, which I’ll try and avoid showing you, but despite that I actually really like it. Don’t get me wrong, it really does have issues with wonky quilting, but I know for a fact that I just couldn’t’ve done it any better on the little machine I was using. And more to the point, I really enjoyed making this, which is the point of it all… right?

quilt close upThe colours are very different to the previous one — that was all browns and more natural colours. I’ve used up some of the brown from that one on this too, but mixed it with turquoise, pink and grey. I actually had most of this fabric knocking around the house — except for the dark outer border, which I bought after a rather stressful search at the knitting and stitching show. Who would think it would be THAT hard to buy dark grey fabric with a subtle pattern? Sheesh! You’d think I was looking for the still-glowing feathers of a flaming firebird! (I’ve been reading Russian fairytales recently). Thankfully my shopping buddy spotted it right at the end of the day and solved all my problems.

quilt distanceWhen I planned this out, it was more evenly tonally spaced, but every time I packed up sections after a session, I packed it differently, so every time I had to lay it all out again from scratch! (I know, I know. Can’t be organised *all* the time.) It was patched together using the 9 patch block umm… plan. So three rows of three and then stitched up from there. I like this as a technique – and there’s a million tutorials on YouTube for it.

back

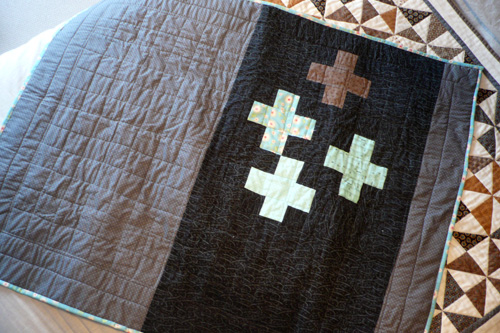
This is a rather terrible shot of the back — but you get the general idea. I was doing everything I could do use up what I had. I’m not 100% sure the blue-grey goes with it, but quilts are supposed to be a *bit* mix and match… aren’t they?

binding
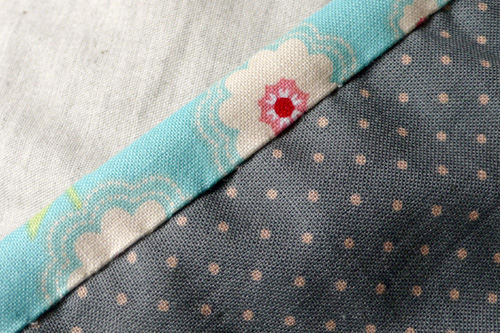
This is the ladder stitch I used to hand bind the back. I came across this tutorial, which is so simple, obvious and great. Previously I’d just used whip stitch or ‘tiny stitches’ as some tutorials say, but this is so much better! Seriously, you can hardly see the stitches. I’m not sure what it is, but binding is my favourite thing about the look of quilts. (Not the making of). There’s something about a quilt’s binding that just makes it look extra cosy:

binding 2

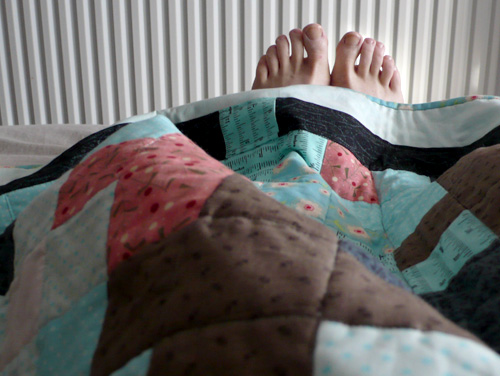
This is both quilts together – I use the pinwheel quilt a lot in the evenings when it’s a bit chilly. Slightly worried that my boyfriend has started calling the new one ‘his’. I did say I’d make him one – not sure this is it though…

bothNow – the reason I made this quilt in squares is because I bought this at the quilting show earlier this year, with some birthday money from my Mum:

fringe maker

Sorry – terrible photo, the light’s been all over the place today. It’s a fringe maker, and I got mine from the quilting show, but it looks like you can get them on Amazon too. Oh my god – if you’re anything like me and can’t measure things or hate measuring things—or if by the time you’ve cut it it’s nothing like the piece you actually measured, this is AMAZING. It’s got a slit for your rotary cutter every 1/2 inch. Just line up the edges with the edge of your fabric and away you go. I love it. (They’re not paying me to say this, but I wish they would.) It made chopping up the squares for the quilt super-easy. So there you have it. Get one.

Other things learnt while making the quilt:
• Quilting straight lines is harder than quilting wiggly ones. I reckon people quilt wiggles as a get-out-of-jail-free card 😉
• If you’re rubbish at quilting, all-colour quilts make life harder. The pinwheel quilt looks neater in real life, because I quilted in cream, on the cream sides of the pinwheels. This time, there was no colour thread that was ideal as it had to cross both light and dark colours. This means that when your lines are wonky, they’re more noticeable.
• Use ladder stitch for binding.

blanket
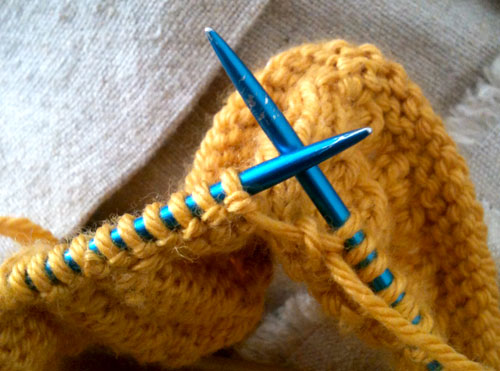
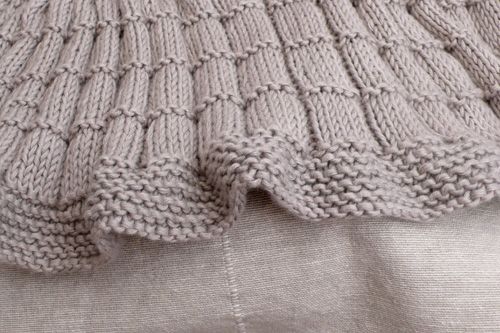
Now I need to get back to knitting a baby blanket. This has been a real pain. The cotton is really splitty, and… I dunno. It’s just been misbehaving. Trust me.

Also, like a lot of tatters at this time of the year, I’m furiously tatting christmas snowflakes! Panic!

See you soon.


Hooked on beads

Lavender bag pink

After tatting a million versions of my own pattern, I sat down to make this a few weeks ago, missed off  a ring and ended up with a more open wreath shape than I was expecting. I stuck with it though, and I think it’s fine (not perfect, but fine). I added the beads to this as I stitched it, which in some instances, I think I prefer…

White lavender bagThis is my own pattern tatted correctly this time – you can see how much tighter it is, and again I added the beads as I stitched it. This is tatted in size 80.

mini cushionBoth of these are made with envelope backs, and both have a little strip of fabric across the opening, which I quite like. I think I like this method for lavender bags actually, but it does take a bit more time – and you have to make a little cushion of the lavender to go inside. I was really tired when I sewed these together though and managed to completely confuse myself. I made such a nice neat hem for the inside piece (the one under the coloured one), so tiny – and then stitched it on back to front so the hem is inside and the rough edge faces outside! You win some you lose some.

bagsI think they look fine though.  I worked on the pattern so much there’s actually another two to come in different colours! I just need to stitch them first.

flowers

I’d always thought that certain methods of using beads wouldn’t be possible as I like to use size 80 thread, and the beads that work best with it are tiny. Certain methods — like you can see in the picture here — require you to pull a loop of thread up through a seed bead, with a hook. How on earth do you find a hook small enough to go through a seed beed? The answer? By accident.

hook(Excuse my gluey finger – I’d previously been doing some DIY). I bought this hook from Jane Eborall. To be honest, when I bought it I don’t think I’d really grasped *quite* how small it was. If you try and look at it when it’s in your hand — really look at it — you go cross eyed! It’s absolutely weeny. It’s so tiny that when it arrived I wasn’t that  sure I’d use it, which is a massive shame, as I really like it. As a day to day hook it can split the thread, but I was thinking about beads recently and suddenly it hit me! I HAVE A HOOK THAT MIGHT WORK! And lo and behold, it is *perfect*. So, thank you Jane – thank you for emailing me when they arrived in your shop, and thank you for knowing what I needed better than I did!

Now I just need to work on some patterns with beads – but I feel like a whole new world has opened up! There is of course a downside — tiny tiny beads don’t mix that well with bumpy train rides, which is where I tat the most. But I’ll work on that.

Have a great weekend!


Bags, packages and baggages

bag

Hello! How are you? Hope you’re ok and not too hot. If you’re not in the UK, it’s actually sunny here at the moment and it’s not really something we’re used to – or mentally equipped to deal with (!). Rain is forecast though, and so I’m sure normal service will be resumed shortly.

I made a bag, as you can see. I kept looking at the tatting plonked on top of that red fabric shoved in a box and I decided I should do something with it.

tatting

I started with just the border, then decided I actually really did need a drawstring bag to keep some stuff in, so  took the plunge and made the whole front piece – to match the size of a drawstring carrier bag I was using from Gap. Then I thought I should have some fun and I patchworked a section for the back too, and quilted them.

patchwork

It’s so cosy with the quilting I wish I could get *in* it. I must admit, I really did enjoy making this. It was something I wanted, with fabrics I liked – and as I was making it up as I went along it was really low stress. I usually enjoy all the crafts  I do (otherwise, why do them?) but often I’m learning something or testing something out. With this, I just made it for the hell of it and planned it as I went along. As a final touch I added interfacing to the fabric at the top to make it a bit stronger, and the cord is reused from an old in-flight bag, from Virgin airlines. I think I could do with an even bigger bag now, and so I’ll make another one when I get a chance. It was nice to be able to use that tatting too, I’ve had it for ages now and this feels like a good use for it.

I must admit, I was a bit fed up when I wrote the previous post. I think I needed a holiday, which is lucky, as I’ve just had one 🙂 One of my closest friends happens to double up as one of my most distant friends, and lives just outside Venice. I flew over last Saturday, and got back on Friday. We had a lovely time, chatting, watching a STACK of TV, eating ice cream, deconstructing our lives, finding no answers and drinking spritz. We also went to the Venice Biennale and saw some art. Well, a lot of art actually. And Venice itself is of course, beautiful. If you think it’s hot in the UK, boy is it hot there.

crane

It was also my birthday on Friday, and I arrived home to a brilliant and thoughtful package of crafty stuff from another good friend – this one a bit closer. Umm, I have an admission to make. I really like cranes and huge building sites. There’s something about them that just looks so alien – I think they’re fascinating. Often I walk through the city (of London) on the way home from work and snap some of the buildings-in-progress. The one above ‘The Cheese Grater‘ being a particular favourite. Why am I telling you this?

crane fabric

Because my friend bought me this fabric, which I think is hilarious! It really made me smile. I’m not sure yet what I’ll use it for, but something good! She also bought me some really lovely striped squares from deckchairstripes.com, a great looking book on bag making, some notecards featuring sloths (another favourite) and THIS:

measure

A beautiful bag she’s made (with seams far straighter than mine 😉 ) and a stitch counter, like the one I was admiring way back in March! I opened this part of the present thinking how nice it was that we’d made eachother bags, and nearly fell off my seat to find this inside. I’m really very lucky – not just for the gift, but to have a friend that would go so far as to notice I’d even liked this in the first place and to track it down. I still can’t believe it.

And finally, the Little Blue Monkey went off to his new home the other week, complete with a nice red hat, and giant pom-pom, and was very well received. All is right with the world.

hat


Warm weather, woolies

Bear

It’s been a funny month or so. My partner has been away for work for 3 weeks, and even more weekends, and so its been rather quiet. It’s given me some time to get on with a few things (and not get on with others – like the garden, ahem). I made this bear over two weekends, and I must admit, I’m in two minds about it. I like the fact that he’s shaped like a traditional bear, but I’m not at all keen on his arms. I’ll make it again at some point and see if I can make a better job of it. I like his feet, and his little tail though:

tail

That aside, I’ve made a knitted dress for one of the monkeys. I can’t even remember what made me look up a pattern actually, but I found this one (Ravelry Link), which is perfect – knitted flat, and very basic:

dress

Actually I’ve discovered I do my yarn-over-knit-one’s backwards, but at least I’ve worked that out now and can fix it for next time. I also finally found a use for one of the tiny crochet roses I made about a year ago:

rose

Oh, and I knitted this on these cheap blue knitting needles from Tiger. (Tiger is that store that you only buy things you didn’t know you needed from, because their stock changes often and is always *really* random.) I only mention it, as I love the colour of the needles with the yellow – the paint’s already flaking off!

needle

I like the idea of being able to take a toys clothes on and off – never seems entirely fair to trap them inside, so this one has little buttons at the back:

buttons

Not the neatest knitting in the world, but I don’t think she minds… I also made this little chap. I wasn’t concentrating properly when I made his head, and so he’s a row smaller than he should be – but for some reason i really like this one. He’s a really happy little chap.

monkey

He already has a home to go to, and he’s been waiting SO patiently. I hope he gets to go soon, or he’ll have to go by post, and no one likes travelling by post.

And finally, I’m itching to use this fabric, so I’ll wish you a pleasant rest-of-sunday, and see you all soon.

fabric


A speedy getaway

Blue monkey

I went to Barcelona for the weekend! Just got back earlier this evening. I was staying with friends who moved there about 8 or 9 months ago, and they have a little boy. When the baby was born (about 2 years ago) I had the best of handmade gift intentions, but what actually happened was that I made a pair of booties that I didn’t think were up to scratch. In the end I didn’t gift them and they’ve been sat in the cupboard ever since…

This time I decided to go for something I’d made before and had a better chance of getting right. Yup, another monkey. I finished it at 1am on Thursday night, and it was wrapped and gifted by Friday evening – and very well received!

This one is made in simple Rowan Dk, and actually he turned out rather nicely. He looks a little bit unsure of himself, but I think he’ll settle in well. (He was wrapped again every evening, so they had the excitement of opening him again each morning 🙂 ). I think for children, something softer and more ‘wooly’ works better than the cotton I used on the green monkeys.

Ahem. Yes, the green monkeys. If the red scarf on the blue monkey looks familiar, it’s because I swiped it off the green monkey. But hey! They’re all friends. I’m sure they wont mind…

wedgewood 2And now to get ready for work tomorrow. Before I go though, the lovely Tiny Inc is having a giveaway! If you’re in the UK, check out her blog (and the amazing cushion which is part of the giveaway!).

In the pink

tatting

I’ve had a very nice afternoon, but by the time you read this, it will’ve been a week ago. I’ve been making a present for my mum, and I know she reads my blog sometimes, and so I wont post this until the gift is given!

bag

This is not quite what I was intending to make – I was going to use the daisy chain to decorate this, but it wasn’t working that well. After some consideration I decided to decorate the bag with a different piece of tatting, and add some beads which would co-ordinate with the top section of fabric.

tatting and beads

I love the beads and the fabric actually – they’re a nice muted sage green. I sewed the beads on as I stitched the tatting to the fabric, which worked quite well. Biggest problem was finding a needle small enough to go through the beads – I keep buying needles and can only assume that the Borrowers get to them before I do, as I can never find them!

I really like the piece of tatting on here – I was unsure about it before, but I think it looks perfect on a bag like this, embellished with beads. (I’m tempted to make another one now! It was from this pattern, and looks rather different here.)

pink

And there’s the pink! I used a pink lining for the inside, which just peeps out at the top. I’m really pleased with it, as I think it just adds something a wee bit extra – I love how muted the rest of it is, with pink to add some contrast.

I had to hand stitch around the top as the bag was too small for machine sewing. It’s not perfect, but I did my best. I hope she likes it.

Doing something (else) with my tatting

Bag close up
(side note – clicking any of these photos will make ’em bigger.)

Last year, when I decided I was producing a lot of tatting and it was about time to do something with it, I made some lavender bags. A complete sewing novice I thought they’d be a good place to start. Actually, they were… Tiny practice pieces, all a bit wonky, none of them with the motif actually in the middle. Luckily lavender smells lovely and if you squint a bit the wonkiness fades, so they do the job quite nicely.

After my quilting adventures, and an earlier attempt at a drawstring bag, I decided it was time to try something new with my tatting. Still all straight lines of course, but, you know – no point rushing in to curves!

Drawstring bag

I’m quite pleased with this. Made a few mistakes but learnt a bit too. I did have to unpick the sewing that holds in the drawstring about 5 times – it’s actually very tricky at that size on the machine. Next time I might do it by hand. I’ll also plan to sew on the tatting in advance rather than in the middle of everything, because I got so impatient with it!

I mentioned in my previous post that I finally sewed in the ends of a few pieces of tatting I’d had sitting about, including the Mary Konior pattern made in Valdini thread . I must admit, I really wasn’t that keen on the colours of it at all, but after blocking and sewing, I’ve changed my mind.

valdini bag

In the end, I just wanted to use it for something – anything really, and so I bashed out another lavender bag. I think I overstuff them usually, but this time I was a bit more sparing, and it makes it look a lot more professional! I think the linen knocks a bit of the garishness out of the colours – generally mutes it a bit. Now I’ve actually gone from not liking it much at all, to loving it!

So, all good. Room for improvement, but ok for a Sunday afternoon.

Finished

I finished this wee lady earlier this week. Or at least I finished sewing her together. Today I’ve just been hunting for scarf ribbon in the collection I seem to’ve acquired over the past few years. I was going to make a shawl, but I don’t really have any yarn the right colour – lots of colours gets lost in the grey of the skin or overpowered by the colour of the dress. I went through my ribbon stash, was about to opt for something else and then remembered this. It’s not perfect, but it should be ok. (sorry for the not very well styled photo).

Here she is with her older sister too. Not sure how she ended up with a slightly thicker trunk… You might be able to spot that I did the front loop /back loop stitches this time – as per the pattern. I like it. Makes the arms and legs look more defined.

Not been  the best of weekends. Problems with my neck and shoulder again. I feel bad for not writing up the poor new elephant as nicely as she deserves, but I think it’s better to quite while I’m ahead.

Trouble in toytown

I’ve been making this monkey for what feels like forever. I started before Christmas and it seemed to be working up pretty fast. I was making it as a gift  for a little lady I know, (very little) but then realised actually she was too little, so all urgency was off. Which was lucky, as I couldn’t find any eyes the right size.

I continued after Christmas, but had lost enthusiasm – mainly for the fact I wasn’t sure about the cotton I was using. I actually really like the cotton, but I’m not sure it’s right for this kind of thing. I’m really picky, I know that  – but actually, you see more of the crochet in this than you do the character of the monkey. You can see every stitch. With thinner cotton, the stitches are still visible, but of course they’re smaller, so you see more of the monkey and less of the crochet… With wool, the stitches blend in more because the texture is fuzzier. Does this make any sense? I look at the monkey above and I see more of the fact it’s a bit of crochet than I do that it’s a monkey, and that’s wrong.

Also, I couldn’t get the accessories right. I made a shoulder bag; didn’t look right. I tried a cotton scarf; didn’t look right. I tried a ribbon one; again not right – wasn’t right as a more formal tie, either. I wanted to make a hat; couldn’t face it. In the end I found something I’d put to one side a while back and pulled it apart, and it became the top part of the hat. Making the rest of the hat was easy, and I decided to finish it off with a little flower. Having said that, this has always felt like a boy monkey to me, so now I can only really think of him as a cross dresser.

Sheesh. Who knew hobbies were so *hard*. This is meant to be fun, right? We need to live together for a bit i think (not you and I, although I’m sure that would be lovely, but the monkey and I), so I can see more of the monkey and less of an annoying thing that i had to get over with. Poor chap. Chapess. Monkey.

PS. I should’ve called this blog Occasional Monkey, shouldn’t I?