Ugh…The pouch of pain

ugh 1

So… I would love this blog to be full of all the spectacular things I make, but sometimes, the things I make are far from spectacular. I’m posting this just incase any of you are under the illusion that everything I make turns out the way it was meant to. *sigh*. (Apologies for the horrible photos, but even I can’t make a silk purse out of a badly knitted one).

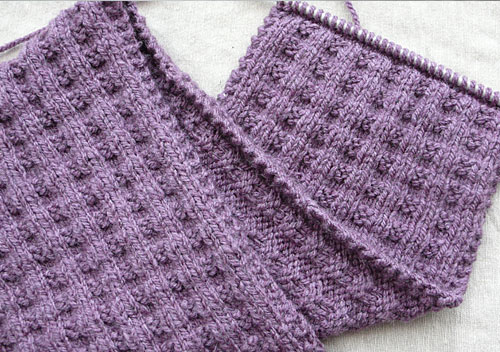
I had such high hopes for this pouch. So high, I STARTED FROM SCRATCH THREE TIMES. Yes. Three times. from the very beginning. Up to about half way. Incidentally, that up there is the best view of it.

ugh 2

I’m actually annoyed because until I had to sew it together, it looked like it would be passable. Sewing it together just turned it into a mess. All the edges are wonky – I even tried to crochet the edges to tidy it up, and that just made it worse. (I crocheted the edges around the flap – that did improve it.) I guess this is why people knit in the round, isn’t it? The edges were just horrible. I hate to say it but crocheted edges are so much neater!

This is the inside. It’s my first attempt at Fair Isle knitting – and actually I don’t think I did too bad. (There are a few long strands of 8 stitches I should’ve secured, but forgot!). I was worried that it had puckered a bit (a common problem i think) but ironing it made it all look rather nice. I even managed my first ever button hole (ok, I did that twice too). And increases and decreases. I should’ve taken a photo before I sewed it together. Oh well. I can’t un-stitch it, incase you were gong to suggest that. I’ve already tried it 4 or 5 times, which has made the edges even worse.

Oh well. I have learnt a lot.
These are some useful videos:
SSK / slip slip knit – it’s a decrease.
Fair Isle (very good video)
Button Hole

Sorry to be so grumpy. It was just such hard work, and was SO CLOSE to being ok.
Bloody thing.

Any particular make of circular needles I should look out for?

//edit – that was my 100th post? Oh honestly!

Monkey hat!

Monkey hat

I’ve had a few balls of nice yarn sitting about for *ages*. I bought them for a crochet project and then changed my mind. Then I saw this sweet pattern on Little Cotton Rabbits site, and wondered if I was capable of making it… Then I thought I should quickly see if I could walk before I could run for a change, and make something easy with two colours first. (No, I haven’t finished my Guernsey wrap yet – it has doubled in size though!)

Hat

This is the Innocent Smoothies Big Knit Pattern, with a few adaptations. I wanted the rib to be a bit more obvious, so I knit 2 / purl 2 for 4 rows – which made each rib wider and longer than they suggested. Then because their language is a bit chatty I couldn’t work out how many rows I was actually supposed to do, so I made it 12 in total before the decreases (was that right?). The rest of the instructions I followed as suggested.

hat_3

I’m actually away from a Post office between now and their 1st October deadline, and so Monkey gets a new hat, and I’ve learnt how to make them for next year. (I hope they wont mind). It’s a nice little pattern to learn stripes with. I looked at a few You Tube videos for help and this one seemed to do the trick.

Also HOW CUTE are these photos?! It’s my partners camera – which he says cannot fail to take a good photo. I think for once, monkey was the perfect model! (He can pull a slightly sarcastic expression at times.)

Found: crafting mojo

kindle case

If there were Olympic medals for ‘having a bit of a think’ I would surely get one. I got a Kindle Touch for my birthday at the beginning of August, and I’ve been having a bit of a think about making a case ever since. You know what? I just finished it about 10 minutes ago! That’s it up there.

I really ummed and ahhed about what fabric to use. I actually thought this patterned Amy Butler fabric was too nice for this – and then I realised I was being an idiot. I bought the plain and patterned fabric together, on a whim, from an offcuts basket. They’re lovely, of course, but there is no über project – is there? If we spend our lives waiting for the perfect project to use this fabric or that button, we’ll be waiting forever. I’m not saying ‘waste fabric’ but… I don’t know. There’s no perfect project, buy stuff you love and enjoy using it.

pocket

So anyway, now *that’s* out of my system – the Amy butler fabric is a pocket! It’s to put the cable in. If you do a bit of a google for Kindle tutorials you’ll see this a lot. I like it. To be honest, there are loads of tutorials out there, so I used half a Kindle tutorial and half this iPad cover tutorial (which is really good). I considered more complicated options (this tutorial looks brilliant) but frankly, I feel like a lost my crafting mojo a bit and I just wanted to make something super uncomplicated. I didn’t measure anything – which lucky for me worked out ok – and nothing was straight! But y’know. No one died.

lining

I’ll let you into a secret though. The Amy Butler fabric, the co-ordinating solid brown… It’s all very tasteful. And then I thought maybe it’s a bit TOO tasteful? So the lining inside is that slightly lurid green with multicoloured flowers! It doesn’t match at all and I love it. The button came free with an Etsy order ages ago and was a suspiciously good match too.

handy

Last time I went home, my mum gave me this. It’s a little plastic case with a load of different threads in – she said she picked it up somewhere as it was quite cheap and thought it could be useful. As I was about to embark on this epic journey, I realised I didn’t have any brown thread. I cannot believe what a perfect match was inside this box! It might not be the kind of thread you make an heirloom gift from – but if you’re prone to making small projects on a whim (even if it is a well pondered whim) then this is perfect. It’s just a small amount of each colour to tide you over. And it includes needles. Amazing. What a brilliant thing to have knocking about.

So there you have it, a new Kindle case. It’s a bit wonky, obviously – but I couldn’t be happier.

Time suck!

Guernsey Wrap

I am still alive! When I started this blog, I didn’t used to do *that* much crafty stuff – hence the name. Then I gradually got more and more hooked. At the beginning of this year I was trying to post every week (or so) and now look. A month’s gone by and not a word. Well, it’s been a busy month I guess – I went to Venice to see a friend, (and ride in a helicopter) and work’s been busy. But enough of that.

Knitting! I’m absolutely in love with this pattern, by Jared Flood (which you can see above). It’s pretty clear I’m not alone – if you look it up on Ravelry you’ll find everyone else loves it too. It’s such a good beginners pattern! It’s just knitting and purling – and watching the patterns form is really addictive. I’ve seen some people stress with getting to grips with the chart – but just incase you’re going to make it, I think the most important thing to know is that every row starts with knit 3. Once you understand that, you’re off. It’s really so nice to knit.

I followed the advice of other Ravellers in terms of yarn, and I’m making it in Cascade 220 wool, in charcoal grey. I bought the yarn a while back, but have been forcing myself to finish this first…

waffle scarf

This is the Waffle scarf I made, with the massive ball of yarn I got for Easter, from my mum. It’s not a brilliant scarf, but it’s certainly the very best I could do. It was also really good practise for getting to grips with knitting. I used an adaptation of a simple repeat pattern on Ravelry – and you can find it here. If you dig about to see what other people think, everyone says the same thing – it curls up at the edges like crazy! Still it’a great pattern for a beggining beginner.

The Guernsey Wrap needs to be blocked to within an inch of its life, I believe. That’s what everyone says – and it should make the edges nice and neat. I’ve got a hell of a long way to go before I get there, but I’m excited to see how it all turns out. So stay tuned.

In other crafting news – I got a Kindle for my birthday. There are two things about this (well, three if you count me telling you how much I like it). The first, it stopped me train tatting which is very bad. That said, recent busy times at work have made me start again. Sometimes when my head is whirring with the day’s events I can’t read a book, digital or otherwise. That’s when train tatting comes to the rescue. It’s brilliant for calming a buzzing brain. I’m making a pattern I make all the time, so all I have to do is count. It’s perfect.

The second Kindle thing; I need to make it a case! Trouble is, knitting has just eaten up my weekend time. I also have lovely fabric I got for Christmas which I need to make a crafting bag/tidy with. There’s just never enough time, is there?

EDIT: PS – By the time I came to start the wrap, I’d forgotten how to cast on. The pattern suggested the Long Tail method, which is handy, because my mum taught me that. Or it would’ve been handy if I could’ve remembered it! You Tube helped out – and this video is quite good.

Tatted train-doodles make it home

blue

It’s amazing what a difference a camera can make. Mr Occasional Crafter took the above photo on his camera, as for some reason mine just wasn’t really cutting it. It’s far too blue, but I decided not to correct it, because I love it! It makes my tatting look amazing, I think.

Back to harsh reality now, and the photos I took. Sorry!

pins

I’ve continued to ‘doodle’ with my tatting recently, which I’ve rather enjoyed. While one part of me worries that I’m not tatting with a purpose, the other part is quite enjoying wingin’ it. I’ve been tatting daisy chains again – or rather daisies, and then joining some as I go to create more solid shapes. The plus side of this is that it really shows how useful split rings are – without them I’d’ve needed to cut and tie a few times, the minus side is that I could really do with actually planning it a bit to make a more fluid or useful shape.

I’ve been using a lovely silver grey DMC thread (size 80), which tats up beautifully. It seems to have really good stitch definition for some reason – almost more than other colours – and I’ve loved using it. This weekend I decided I’d stitch it onto… *something* and then decide what to do with it. For once, I decided against linen – maybe the tones were too similar, I’m not sure, but it really didn’t look that good. I almost went with black, but at the last minute switched to grey. That old grey sheet I saved from the charity shop is really earning its keep!

I pinned it out before stitching it, as you can see. Then I unpinned it as I stitched and completely changed the arrangement bit by bit. It seems appropriate. Tatted as a doodle and stitched as one too.

Layout

Sorry – the photos really are all over the place in terms of colour, but at least you can see the layout here – and the beads. I sewed the lighter beads on first (they’re actually a silvery grey), and then at the last minute, after realising I had some, I sewed the black beads on for some contrast. I wasn’t sure about them initially, but actually I think they work quite well.

close up

I’m not sure yet what I’ll do with it… maybe a panel for another drawstring bag? It’s a bit big for a lavender bag. Actually, maybe I could use it as a panel on a fabric basket? I’ll have a think. All suggestions gratefully received!

Either way, I really enjoyed making it. Also, it does look rather nice. So nice in fact, I’m quite surprised I actually made it. (I’m not showing you the back though).

In the pink

tatting

I’ve had a very nice afternoon, but by the time you read this, it will’ve been a week ago. I’ve been making a present for my mum, and I know she reads my blog sometimes, and so I wont post this until the gift is given!

bag

This is not quite what I was intending to make – I was going to use the daisy chain to decorate this, but it wasn’t working that well. After some consideration I decided to decorate the bag with a different piece of tatting, and add some beads which would co-ordinate with the top section of fabric.

tatting and beads

I love the beads and the fabric actually – they’re a nice muted sage green. I sewed the beads on as I stitched the tatting to the fabric, which worked quite well. Biggest problem was finding a needle small enough to go through the beads – I keep buying needles and can only assume that the Borrowers get to them before I do, as I can never find them!

I really like the piece of tatting on here – I was unsure about it before, but I think it looks perfect on a bag like this, embellished with beads. (I’m tempted to make another one now! It was from this pattern, and looks rather different here.)

pink

And there’s the pink! I used a pink lining for the inside, which just peeps out at the top. I’m really pleased with it, as I think it just adds something a wee bit extra – I love how muted the rest of it is, with pink to add some contrast.

I had to hand stitch around the top as the bag was too small for machine sewing. It’s not perfect, but I did my best. I hope she likes it.

Monkey (and other) business

Image

I meant to post something here last week, but by the time I got around to getting started it was too dark to take any photos.

Another mixed bag this week – odds and ends of things. Above is my current train tatting – still on the daisies, but this time pink. I just loaded up the shuttles with what looked like a sensible about of thread, and will carry on until it runs out. It’s lovely to tat like this – there’s a few onion rings in there as leaves (not shown above), and a few standard daisies as well. It’s just a bit of meandering about, no set pattern, which is quite nice for a change. I was thinking about getting some gauze, the kind people makes scarves from, and tatting an edging for it… I thought it could be a good ongoing project, perhaps?

Image

In stark contrast, here’s a new drawstring bag I made! For christmas I received an extremely generous gift – a voucher for the Make Lounge. I spent a long time thinking about the type of class I’d like to take, and in the end, decided on screen printing. I wanted something that would be fun, but that I could possibly do at home. (I thought long and hard about sewing, but classes are all taught on an electric machine, and it felt weird being unfaithful to my Singer!) Then of course, I needed to think of something to print, so drew a monkey, and some elephants:

Image

Now, the thing with this type of screen printing is that you have to cut it by hand — and we didn’t have time to do repeat patterns, and so I adapted the characters a little on the night. (I prefer the planned monkey, but went a bit nuts and cut it differently by accident!) 

Image

Unlike everyone else, I took some calico with me, and screen printed a couple of extra prints. I wasn’t too sure – I’m still not too sure – what to do with them, but once you’ve got the screen working, seems a bit nuts not to make the most of it. I pre-washed the calico, and flippin’ eck, it’s not easy to iron, is it? Yes, I DID iron it while it was still damp, but to no avail. Amusingly, I saw that Patch had the same issues last week.

Image

They gave as a little bag to screenprint, which you can see on the left. It’s really cute – child sized. I also have a tea towel with a monkey on each end.

It was a great evening – amazing how fast you can relax and forget about work and all your troubles when you have something fun to do! I’m not sure if I will screen print at home – does require space, and creates a lot of mess, but it did get me thinking about lino printing, which I’ve not done since college, and used to love. I know you can do that with a roller for the ink and the back of a spoon for a press, so we shall see…

Image 

And finally, I thought I’d use up a few scraps, and try a log cabin lavender bag. As you can see, this ended up rectangular rather than square as I decided it was getting too big. The patch with the ‘7685’ on it is the selvedge of the dotted fabric, which I quite like. It’s an odd little thing, but quite cute in real life. Now it lives in the monkey bag with the other scraps and makes them smell nice.

Hope you’re all having good weekends!


Odds n’ ends

hippy

Hello! I’ve had a few days off, weekends away, and various house guests, which is why I’ve been a bit quiet recently. I have been tatting a tiny bit, although not as much as I’d like – mainly as I can’t always get a seat on the train, which is where I usually tat. Spare evenings are still taken up with The Knitted Scarf, which is coming along nicely. (Although not without a fair bit of unpicking, whilst trying to watch Alien in the dark. Unpicking knitting is quite frustrating, isn’t it? Not so with crochet.)

Above is the trusty Stormtrooper, engaged in a bit of a scrap with some train end-of-shuttle doodles. I do like these daisy chains…

daisy chain

These are size 80 thread… I’ve not really decided what to do with them yet.

daisy2

They’re not that big. Perhaps the right size for a bracelet or a necklace, but a bit delicate. I’ll stitch them on to something, I think. Not sure what yet, but it would be nice to use them for something.

piggy post

This little piggy is currently in transit. He lived on the shelf for a little while, and then decided it was time to head out. I love making things for people – but I just can’t make them to order! Ages ago, after a lot of not-so-subtle hints, I made my friend and elephant. Her mum and I were with her when she opened it, and her mum really seemed to love it. I always meant to make her one too, and then time wore on and I forgot. As I was wondering what should become of the pig, it dawned on me that maybe she would like it, so off he popped in the post. Hopefully she’ll get it next week. It’s always a bit tricky as they’re not *that* sturdy, so they’re not really toys for very little kids. They’re shelf dwellers really, but they do like to be loved. I hope she likes him.

In other news, I went to Yorkshire for a few days which was lovely. I had a brilliant time (seaside, countryside, cream teas and brilliant company!). We went to Nunnington Hall, and spotted this lovely crewel work:

crewel

There were three panels, all quite large and they were beautifully done. They had chunky stitching and felt quite free-form, although they were carefully planned out with lighter stitches before they were filled in. I loved the feel of them though (visual – I didn’t touch them!) As I’ve said before, I’m not a needle worker, but I would potentially make an exception for something like this… Like I need another hobby!

Body of Evidence

New body!

…aaaaaaand relax. The little piggy has a brand new body, and I think we can safely say, everyone is much happier. Or at least I am. Thank you for your comments on my last post. You were right. As much as it would’ve been great for everyone to say it was fine, it wasn’t, and I felt his body really didn’t do his head justice. There’s nothing more unsatisfying than a half done pig, is there?

sketch

This was the idea, before I got started. (I sketched it in a meeting. Bad habit.) I think it wasn’t a bad likeness in the end. No belly button of course, but I do like the two wooden buttons, I think they add a bit more interest. I still love this yarn – the Simply Recycled cotton. It’s really soft and the colours are so nice and muted.

side

And here we are from the side…

tail

And here’s the other side, with his tail peeking out. Phew. All done. Believe it or not, as I have more yarn, I’m tempted to make another one.

A mixed bag (may not contain bags)

Image

This little piggy has been a bit frustrating. I’m not sure what to do with him/her, but I think it’s not over yet. This is body number two – I actually finished the whole thing once, lived with it for a week or two and then took it apart. This is the body as written in the pattern, but I think it’s a bit messy. Too many decreases, which just don’t look good. It’s a shame as the head is such a great shape and so nicely written up, but I just think the body doesn’t do it justice. It also doesn’t suit a scarf – or anything else I can think of as yet – to distract you from the not-very nice shape. Will think on. Any suggestions appreciated! Poor little piggy!

Image

I’m a fan of the yarn though – it’s lovely! It’s the Sidar Simply Recycled, and is lovely and soft. The colours are also really nice, quite muted – a bit more natural looking. I’d definitely use it for making toys again. This little chap is much bigger than the last one.

Image

This is an experiment, made the other week. It’s tatted in size 40 thread, and is actually the pattern for a bracelet. The thread is much thicker than I would normally use – but probably a bit more of an appropriate size for jewellery – that said, as a bracelet I think it would drive you nuts! I love the idea of tatted daisy chains, but maybe just not this one. Rather than waste it I made yet another lavender bag. (I think I underfilled it too – after all my months of overfilling I’ve tipped back too far in the other direction!)

Image

But look at this – it’s knitting! A waffle scarf (ravelry link), and it seems to be going ok (she says, touching wood, with crossed fingers). Now I’ve got the hang of it, I’m really enjoying it. It’s a very simple pattern of course, but nice for a beginner, and a great TV project. I’ve already planned my next project – bought the pattern and the yarn, but I’m going to be good and finish this first. Very exciting!