Hey monkey! Show us your sock…

I know you’re supposed to put the most enticing photo at the top of a blog post, but it’s been a long day and this one made me laugh the most. Hello! There’s been a bit of a pause on posts recently as I’ve had no chance to take photos of anything I’ve made. I leave for work in the dark and it’s dark when I get home, and my stroppy camera hates anything but sunshine. I did manage to grab a few snaps this morning though, and so here I am.

I made the monkey up there years ago. It’s the second toy I ever crocheted actually, and sits on my boyfriend’s desk. The sock I made about a week or two ago, and it’s a mini Christmas stocking, from the bottom pattern here. It’s so cute in real life! It’s probably not the best knitting you’ve ever seen in your life, but it’s the first time I’ve used DPNs and I actually managed to make a decent job of mattress stitching it together. If you’re a good knitter, I think you’ve have it done in no time. I know the colours aren’t very xmassy, but it was a test really, to see if I could do it.

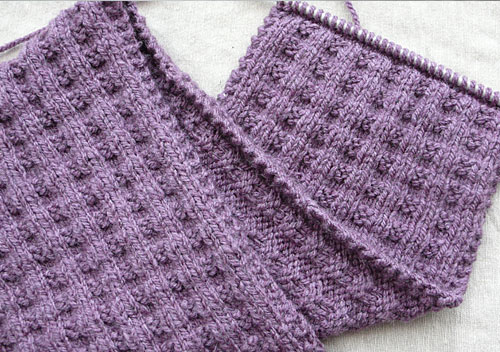
I made another version of the pouch of pain. Still not great, but better than it was. Annoyingly this one seems to show up the tightness of the colour changes more than the other one (it’s actually a little better in real life than it looks here.) The pattern suggests that you go up in needle size when you start the leafy design, but I don’t have that many knitting needles yet, so I couldn’t do that. It’s quite a bit smaller than the first one… I was tempted to line it with fabric, but it’s just not that great, so I don’t think I will. Anyway! Nothing ventured, nothing gained. Oh – and I did the increases this time, so the base is rounded a bit. Again, looks better in the flesh.

I treated myself to these lovely hand dyed threads from Yarnplayer recently. They’re size 80, and for tatting. I’m really looking forward to using them, although I’m undecided yet as to what I’ll make. You have to be a bit careful with variegated threads – if the pattern is too complicated it can end up looking really confusing. I still think this is one of my favourites. That said, it’s getting to snowflake making time again. Gah! I was going to start early this year.


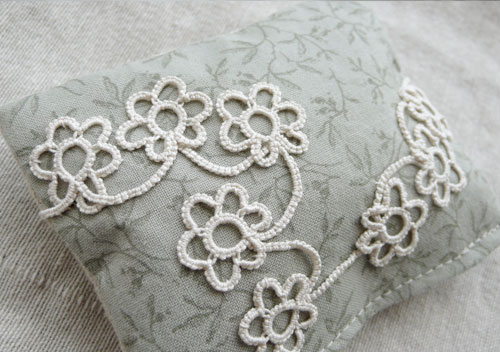
I’ve been making this again on my commute. Almost there, and then the ends to sew in. It’s in the Valdani quilting thread, which I do have a certain affection for. Occasionally I panic as I think it might snap, but that aside, I like the fact it’s ‘dull’ – there’s no sheen to the thread. I made a lavender bag earlier this year with the same pattern, and actually I love it. Something about this colourway on linen works really well.

Aside from all that, I’m still knitting my Guernsey Wrap (you can see the beginning of it here). I’ve become a bit desperate to get it finished now as winter really feels like it’s arrived, and I’d like to wear it! I’m over half way, but I need some dedicated time on it. I was hoping today would be the day, but I got sucked into day-job work instead. Haven’t managed to fit any sewing time in either, but I did buy some beautiful fabric a few weeks ago.

So much to do, and so little time! Better get on with it.

Time suck!

Guernsey Wrap

I am still alive! When I started this blog, I didn’t used to do *that* much crafty stuff – hence the name. Then I gradually got more and more hooked. At the beginning of this year I was trying to post every week (or so) and now look. A month’s gone by and not a word. Well, it’s been a busy month I guess – I went to Venice to see a friend, (and ride in a helicopter) and work’s been busy. But enough of that.

Knitting! I’m absolutely in love with this pattern, by Jared Flood (which you can see above). It’s pretty clear I’m not alone – if you look it up on Ravelry you’ll find everyone else loves it too. It’s such a good beginners pattern! It’s just knitting and purling – and watching the patterns form is really addictive. I’ve seen some people stress with getting to grips with the chart – but just incase you’re going to make it, I think the most important thing to know is that every row starts with knit 3. Once you understand that, you’re off. It’s really so nice to knit.

I followed the advice of other Ravellers in terms of yarn, and I’m making it in Cascade 220 wool, in charcoal grey. I bought the yarn a while back, but have been forcing myself to finish this first…

waffle scarf

This is the Waffle scarf I made, with the massive ball of yarn I got for Easter, from my mum. It’s not a brilliant scarf, but it’s certainly the very best I could do. It was also really good practise for getting to grips with knitting. I used an adaptation of a simple repeat pattern on Ravelry – and you can find it here. If you dig about to see what other people think, everyone says the same thing – it curls up at the edges like crazy! Still it’a great pattern for a beggining beginner.

The Guernsey Wrap needs to be blocked to within an inch of its life, I believe. That’s what everyone says – and it should make the edges nice and neat. I’ve got a hell of a long way to go before I get there, but I’m excited to see how it all turns out. So stay tuned.

In other crafting news – I got a Kindle for my birthday. There are two things about this (well, three if you count me telling you how much I like it). The first, it stopped me train tatting which is very bad. That said, recent busy times at work have made me start again. Sometimes when my head is whirring with the day’s events I can’t read a book, digital or otherwise. That’s when train tatting comes to the rescue. It’s brilliant for calming a buzzing brain. I’m making a pattern I make all the time, so all I have to do is count. It’s perfect.

The second Kindle thing; I need to make it a case! Trouble is, knitting has just eaten up my weekend time. I also have lovely fabric I got for Christmas which I need to make a crafting bag/tidy with. There’s just never enough time, is there?

EDIT: PS – By the time I came to start the wrap, I’d forgotten how to cast on. The pattern suggested the Long Tail method, which is handy, because my mum taught me that. Or it would’ve been handy if I could’ve remembered it! You Tube helped out – and this video is quite good.

Tatted train-doodles make it home

blue

It’s amazing what a difference a camera can make. Mr Occasional Crafter took the above photo on his camera, as for some reason mine just wasn’t really cutting it. It’s far too blue, but I decided not to correct it, because I love it! It makes my tatting look amazing, I think.

Back to harsh reality now, and the photos I took. Sorry!

pins

I’ve continued to ‘doodle’ with my tatting recently, which I’ve rather enjoyed. While one part of me worries that I’m not tatting with a purpose, the other part is quite enjoying wingin’ it. I’ve been tatting daisy chains again – or rather daisies, and then joining some as I go to create more solid shapes. The plus side of this is that it really shows how useful split rings are – without them I’d’ve needed to cut and tie a few times, the minus side is that I could really do with actually planning it a bit to make a more fluid or useful shape.

I’ve been using a lovely silver grey DMC thread (size 80), which tats up beautifully. It seems to have really good stitch definition for some reason – almost more than other colours – and I’ve loved using it. This weekend I decided I’d stitch it onto… *something* and then decide what to do with it. For once, I decided against linen – maybe the tones were too similar, I’m not sure, but it really didn’t look that good. I almost went with black, but at the last minute switched to grey. That old grey sheet I saved from the charity shop is really earning its keep!

I pinned it out before stitching it, as you can see. Then I unpinned it as I stitched and completely changed the arrangement bit by bit. It seems appropriate. Tatted as a doodle and stitched as one too.

Layout

Sorry – the photos really are all over the place in terms of colour, but at least you can see the layout here – and the beads. I sewed the lighter beads on first (they’re actually a silvery grey), and then at the last minute, after realising I had some, I sewed the black beads on for some contrast. I wasn’t sure about them initially, but actually I think they work quite well.

close up

I’m not sure yet what I’ll do with it… maybe a panel for another drawstring bag? It’s a bit big for a lavender bag. Actually, maybe I could use it as a panel on a fabric basket? I’ll have a think. All suggestions gratefully received!

Either way, I really enjoyed making it. Also, it does look rather nice. So nice in fact, I’m quite surprised I actually made it. (I’m not showing you the back though).

In the pink

tatting

I’ve had a very nice afternoon, but by the time you read this, it will’ve been a week ago. I’ve been making a present for my mum, and I know she reads my blog sometimes, and so I wont post this until the gift is given!

bag

This is not quite what I was intending to make – I was going to use the daisy chain to decorate this, but it wasn’t working that well. After some consideration I decided to decorate the bag with a different piece of tatting, and add some beads which would co-ordinate with the top section of fabric.

tatting and beads

I love the beads and the fabric actually – they’re a nice muted sage green. I sewed the beads on as I stitched the tatting to the fabric, which worked quite well. Biggest problem was finding a needle small enough to go through the beads – I keep buying needles and can only assume that the Borrowers get to them before I do, as I can never find them!

I really like the piece of tatting on here – I was unsure about it before, but I think it looks perfect on a bag like this, embellished with beads. (I’m tempted to make another one now! It was from this pattern, and looks rather different here.)

pink

And there’s the pink! I used a pink lining for the inside, which just peeps out at the top. I’m really pleased with it, as I think it just adds something a wee bit extra – I love how muted the rest of it is, with pink to add some contrast.

I had to hand stitch around the top as the bag was too small for machine sewing. It’s not perfect, but I did my best. I hope she likes it.

Monkey (and other) business

Image

I meant to post something here last week, but by the time I got around to getting started it was too dark to take any photos.

Another mixed bag this week – odds and ends of things. Above is my current train tatting – still on the daisies, but this time pink. I just loaded up the shuttles with what looked like a sensible about of thread, and will carry on until it runs out. It’s lovely to tat like this – there’s a few onion rings in there as leaves (not shown above), and a few standard daisies as well. It’s just a bit of meandering about, no set pattern, which is quite nice for a change. I was thinking about getting some gauze, the kind people makes scarves from, and tatting an edging for it… I thought it could be a good ongoing project, perhaps?

Image

In stark contrast, here’s a new drawstring bag I made! For christmas I received an extremely generous gift – a voucher for the Make Lounge. I spent a long time thinking about the type of class I’d like to take, and in the end, decided on screen printing. I wanted something that would be fun, but that I could possibly do at home. (I thought long and hard about sewing, but classes are all taught on an electric machine, and it felt weird being unfaithful to my Singer!) Then of course, I needed to think of something to print, so drew a monkey, and some elephants:

Image

Now, the thing with this type of screen printing is that you have to cut it by hand — and we didn’t have time to do repeat patterns, and so I adapted the characters a little on the night. (I prefer the planned monkey, but went a bit nuts and cut it differently by accident!) 

Image

Unlike everyone else, I took some calico with me, and screen printed a couple of extra prints. I wasn’t too sure – I’m still not too sure – what to do with them, but once you’ve got the screen working, seems a bit nuts not to make the most of it. I pre-washed the calico, and flippin’ eck, it’s not easy to iron, is it? Yes, I DID iron it while it was still damp, but to no avail. Amusingly, I saw that Patch had the same issues last week.

Image

They gave as a little bag to screenprint, which you can see on the left. It’s really cute – child sized. I also have a tea towel with a monkey on each end.

It was a great evening – amazing how fast you can relax and forget about work and all your troubles when you have something fun to do! I’m not sure if I will screen print at home – does require space, and creates a lot of mess, but it did get me thinking about lino printing, which I’ve not done since college, and used to love. I know you can do that with a roller for the ink and the back of a spoon for a press, so we shall see…

Image 

And finally, I thought I’d use up a few scraps, and try a log cabin lavender bag. As you can see, this ended up rectangular rather than square as I decided it was getting too big. The patch with the ‘7685’ on it is the selvedge of the dotted fabric, which I quite like. It’s an odd little thing, but quite cute in real life. Now it lives in the monkey bag with the other scraps and makes them smell nice.

Hope you’re all having good weekends!


Odds n’ ends

hippy

Hello! I’ve had a few days off, weekends away, and various house guests, which is why I’ve been a bit quiet recently. I have been tatting a tiny bit, although not as much as I’d like – mainly as I can’t always get a seat on the train, which is where I usually tat. Spare evenings are still taken up with The Knitted Scarf, which is coming along nicely. (Although not without a fair bit of unpicking, whilst trying to watch Alien in the dark. Unpicking knitting is quite frustrating, isn’t it? Not so with crochet.)

Above is the trusty Stormtrooper, engaged in a bit of a scrap with some train end-of-shuttle doodles. I do like these daisy chains…

daisy chain

These are size 80 thread… I’ve not really decided what to do with them yet.

daisy2

They’re not that big. Perhaps the right size for a bracelet or a necklace, but a bit delicate. I’ll stitch them on to something, I think. Not sure what yet, but it would be nice to use them for something.

piggy post

This little piggy is currently in transit. He lived on the shelf for a little while, and then decided it was time to head out. I love making things for people – but I just can’t make them to order! Ages ago, after a lot of not-so-subtle hints, I made my friend and elephant. Her mum and I were with her when she opened it, and her mum really seemed to love it. I always meant to make her one too, and then time wore on and I forgot. As I was wondering what should become of the pig, it dawned on me that maybe she would like it, so off he popped in the post. Hopefully she’ll get it next week. It’s always a bit tricky as they’re not *that* sturdy, so they’re not really toys for very little kids. They’re shelf dwellers really, but they do like to be loved. I hope she likes him.

In other news, I went to Yorkshire for a few days which was lovely. I had a brilliant time (seaside, countryside, cream teas and brilliant company!). We went to Nunnington Hall, and spotted this lovely crewel work:

crewel

There were three panels, all quite large and they were beautifully done. They had chunky stitching and felt quite free-form, although they were carefully planned out with lighter stitches before they were filled in. I loved the feel of them though (visual – I didn’t touch them!) As I’ve said before, I’m not a needle worker, but I would potentially make an exception for something like this… Like I need another hobby!

A mixed bag (may not contain bags)

Image

This little piggy has been a bit frustrating. I’m not sure what to do with him/her, but I think it’s not over yet. This is body number two – I actually finished the whole thing once, lived with it for a week or two and then took it apart. This is the body as written in the pattern, but I think it’s a bit messy. Too many decreases, which just don’t look good. It’s a shame as the head is such a great shape and so nicely written up, but I just think the body doesn’t do it justice. It also doesn’t suit a scarf – or anything else I can think of as yet – to distract you from the not-very nice shape. Will think on. Any suggestions appreciated! Poor little piggy!

Image

I’m a fan of the yarn though – it’s lovely! It’s the Sidar Simply Recycled, and is lovely and soft. The colours are also really nice, quite muted – a bit more natural looking. I’d definitely use it for making toys again. This little chap is much bigger than the last one.

Image

This is an experiment, made the other week. It’s tatted in size 40 thread, and is actually the pattern for a bracelet. The thread is much thicker than I would normally use – but probably a bit more of an appropriate size for jewellery – that said, as a bracelet I think it would drive you nuts! I love the idea of tatted daisy chains, but maybe just not this one. Rather than waste it I made yet another lavender bag. (I think I underfilled it too – after all my months of overfilling I’ve tipped back too far in the other direction!)

Image

But look at this – it’s knitting! A waffle scarf (ravelry link), and it seems to be going ok (she says, touching wood, with crossed fingers). Now I’ve got the hang of it, I’m really enjoying it. It’s a very simple pattern of course, but nice for a beginner, and a great TV project. I’ve already planned my next project – bought the pattern and the yarn, but I’m going to be good and finish this first. Very exciting!

Monkeys, crochet, tatting, sewing, triumph and failure

Finished monkey

Yes, this post has something for everyone. Or at least something for everyone who likes a bit of craft – otherwise, look away now.

I was of course making a pig, last time I posted. It’s still at the head stage, because the Ipad refuses to display the second page of the pattern, and I’ve not really been sitting at my other mac, which displays it perfectly. I will finish it, but over Easter as I was away visiting family, I grabbed two balls of yarn and a hook and decided I’d try out some yarn I bought for monkey making a while back.

Relaxing
(Look at her there – relaxing mid-photoshoot! Honestly. It was quite hard to get her to pay any attentional at all.)

The yarn was ÂŁ2.00 a ball and is Rowan hand knit cotton. I must admit, I don’t love it for this kind of thing, I’ve decided. Two main reasons:
• I crochet really tightly anyway (which is actually very good for making toys) but it makes some yarns tough on the fingers – and this is one of them.
• The stitch definition is a bit too good! Its an odd negative, I know, but I think sometimes the fact it shouts ‘I’ve been crocheted!’ can really get in the way of the character of the toy. Something a little fuzzier is probably better.
While I was away, I made all the boring no-brainer bits: ears, mouth, hands, feet and I started on the rest of the head. I finished the head in the week and today I forced myself to make all the limbs and sew it together. Sewing of course, being the worst job of all.

Usually I put scarves on my monkeys, but today, with sore fingers, I couldn’t face crocheting anything else. Out of the blue I decided to make a dress instead. The monkey is actually an odd colour in real life, and just as I was about to chop up some linen, my head said ‘umm, you’re doing this in a rush, with no idea what you’re doing. Use something you don’t care about’. For once I listened and used a bit of old sheet instead. I must admit, I’ve done a dreadful job on the dress sewing! It’s appalling – and worse – the monkey is trapped inside. I had to sew her in, which is something I really don’t like (it’s sloppy, I think). Having said that – Look at her! She’s hilarious. As I sat down to sew her in, I spotted the crochet flower – it’s been knocking about on my desk for ages – I crocheted it in tatting thread a while back.

flower

I makes a big difference I think. Without it, she looks like she’s in very drab school uniform. Having said all that, I quite like the overall effect, and so I’m going to ponder on it all and probably remake the dress, but better. I did a quick google search before hand incidentally, and found this tutorial. It’s not brilliant, but gave me enough confidence to have a go. I didn’t pin anything or measure anything… it shows. Next time.

If you wanted to crochet your own monkey, I used this pattern again, and just personalised it a bit as I went. So that’s the crochet – and the sort of triumph, on to the tatting / sewing / failure next.

Before Easter I thought I would try making a ‘lunch bag’ style bag, to put tatting on. Most of the tutorials I’ve seen have all been for bags in one colour, but I wanted side panels on mine.

side panel

Only thing is, I also lined it, and by the time I’d finished, it doesn’t really fold over properly, which is really annoying. I think it’s all too small for the thickness of the fabric.

fold

I know it needs a button – but even with it, it’s a very clumsy looking thing – so back to the drawing board on that one.

Also, I’ve been trying out using tatting for a brooch – and I’m not keen on that either!
brooch

This is it 3/4 done – but I’m still thinking about whether to finish it or take it apart. I made the edging in the week (my own pattern, for once) – but it’s really there to hide the fact the circle isn’t perfect. So… how do people make and hem circular brooches? Actually, even as I typed that I think I probably know the answer to that one. They’re better at sewing than me 🙂

Never mind. You don’t know these things till you try ’em.

In other more exciting news – I’m learning to knit! I asked specifically for no chocolate this Easter, and so instead of an egg, my mum gave me a massive ball of practise yarn, a pair of needles and some of her time in teaching me. She’s a brilliant knitter, but doesn’t enjoy it, so it was very sweet of her to put herself through it. What a lovely present. I’ve been forcing myself to get that monkey finished all week, so I can get on with trying to knit a scarf! I’ve got the basics of knit and perl, and I can just about cast on and off (with a bit of prompting). Needless to say I have grand ambitions but like all these things, *trying* to take it one step at a time.

Phew.

Doing something (else) with my tatting

Bag close up
(side note – clicking any of these photos will make ’em bigger.)

Last year, when I decided I was producing a lot of tatting and it was about time to do something with it, I made some lavender bags. A complete sewing novice I thought they’d be a good place to start. Actually, they were… Tiny practice pieces, all a bit wonky, none of them with the motif actually in the middle. Luckily lavender smells lovely and if you squint a bit the wonkiness fades, so they do the job quite nicely.

After my quilting adventures, and an earlier attempt at a drawstring bag, I decided it was time to try something new with my tatting. Still all straight lines of course, but, you know – no point rushing in to curves!

Drawstring bag

I’m quite pleased with this. Made a few mistakes but learnt a bit too. I did have to unpick the sewing that holds in the drawstring about 5 times – it’s actually very tricky at that size on the machine. Next time I might do it by hand. I’ll also plan to sew on the tatting in advance rather than in the middle of everything, because I got so impatient with it!

I mentioned in my previous post that I finally sewed in the ends of a few pieces of tatting I’d had sitting about, including the Mary Konior pattern made in Valdini thread . I must admit, I really wasn’t that keen on the colours of it at all, but after blocking and sewing, I’ve changed my mind.

valdini bag

In the end, I just wanted to use it for something – anything really, and so I bashed out another lavender bag. I think I overstuff them usually, but this time I was a bit more sparing, and it makes it look a lot more professional! I think the linen knocks a bit of the garishness out of the colours – generally mutes it a bit. Now I’ve actually gone from not liking it much at all, to loving it!

So, all good. Room for improvement, but ok for a Sunday afternoon.

Back to the tatting chat

Finished

What with all the quilt euphoria, you might think I’ve not been tatting, but I’m still clicking along in the background. When I can get a seat on the train I always tat – it’s a bit like meditation for me. Stops me getting angry that the trains are always late, and gives me time to mull over the day ahead or just gone. Sadly, the above Storm Trooper refused to sew in the ends, and so I had to finish this off alone. The pattern is from here, and I must admit, does benefit from some beads or other embellishment. It’s a bit plain as it is. (The Storm Trooper helps.) I’m tempted to make it in green though, with red beads, as it does make a nice little holly wreath. Perhaps nearer Christmas.

pile

While we’re talking sewing in ends, this is the pile I’ve forced myself to deal with this week. The beaded one on the right I only made a week or so ago, but the others have been lurking about for ages. In the end, I left them on the kitchen table, and forced myself to do a tiny bit of sewing when I was waiting for a kettle to boil or something to cook. Bit by bit it wasn’t too bad. As a person who crochets, I’m always reading about the chore of sewing in crochet threads – but seriously! Wait till you have to deal with size 100 tatting thread!

half done

This is 4/5’s of a Susanne Schwenke snowflake. I love this pattern when it’s complete – while it’s a single section on repeat, theres something about it that feels a bit erratic, reminds me of sparks flying off a sparkler.To be honest there’s absolutely no way you’d see that from the above, but trust me, it’s nice. Anyway, This was the first attempt, but I wasn’t thrilled with it. It’s a tricksy pattern, and there’s the tiniest bit of bloc tatting in there, which I’ve never done before.

block tatting

That’s me learning block tatting. It’s almost like you tat a chain on one side of the thread, and the next chain on the opposite side. Also, I finally learnt how to make a lock join – tatters, isn’t it hard *not* to flip the thread? Seriously, it felt like I was defying the laws of physics. All that time you spend learning to flip it correctly, and suddenly you have to unlearn it. Anyway…

doneish

This is the second attempt, and I remain unimpressed. The block tatting in it is only three passes, and in size 80 thread, it just looks like a bit of a mistake. Also, I’m thinking that the 4 rings at the end of each ‘arm’ would be much better as SCMRs. As it is, they’re standard chains, attached with a normal join, and it does look a bit messy. So I’m going to tackle it again, with a few alterations… Has anyone out there made this – and if so, any thoughts?

big pig

And finally, I’m making a bigger version of the Little Piglet! I love this pattern, the shape of the head is so cute. I hope I manage to make his body live up to it.

And that’s all for now.

Except, one last thing – look at this brilliant woven bookmark made by a friend of mine! Such a great idea, and I love the thought of a bookmark created for a specific book.