Stitching in the sunshine

embroidery and tatting

Ok, I take it back about yellow. At the end of my last post I said that if you buy yellow thread you’re hardly ever likely to use it. This post disproves all that I guess. Also, I really love that golden sunshine yellow, purely because it reminds me of sunny days, so lord knows what I was thinking. Sorry about that.

I had a little adventure last weekend. A friend and I rented a cottage for a couple of days. I arrived with a sewing machine, cutting board, various yarns, half a monkey’s head and wine. She arrived with weaving, fabric, different yarns –  and scones and clotted cream. To be frank, I’m not sure its possible to arrive armed with anything better! We had a lovely weekend where she conquered (I think) her fear of sewing machines, and I made myself do some embroidery – and finish the monkey. This is our little front room – and on the sofa you’ll spot a blanket beautifully crocheted by my friend’s mum, which came along for the ride. (I can see where my friend gets her super-neat and even stitches from.)

front_room

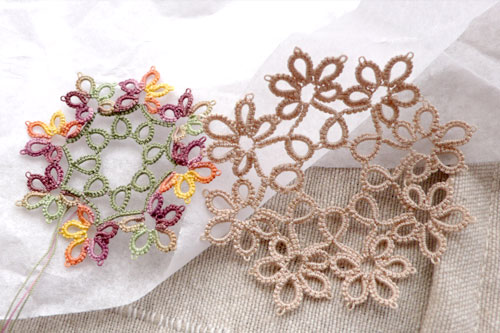
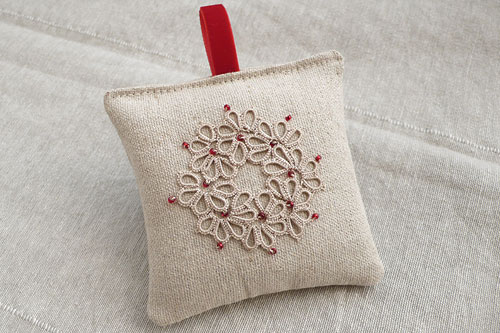
I decided to fill the middle of the wreath (pattern link) I’d tatted with french knots. The joy of a cottage in the country complete with wi-fi means a quick look on You Tube and you’re off in no time. Then I kind of carried on – and actually I think, got carried away. I added the pink on a whim – the skeins of yellow and pink looked so good (and clashy) next to each other that I thought it would be alright. I think it’s a bit too much in reality, perhaps sticking with the yellow and blue alone would’ve been better? I dunno.

Embroider & tatting

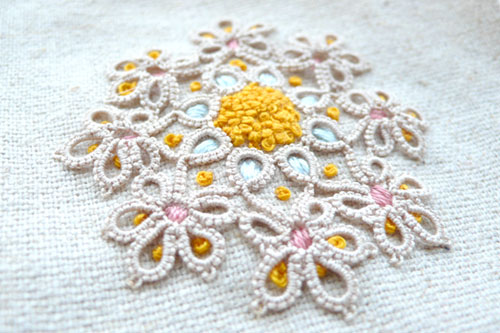
It’s all pretty messy, but I quite like the mix of embroidery and tatting, so I’ll try it again I think. This is the size 50 tatting thread. I think it works well for this kind of thing. I usually tat with size 80, but I think that could be too small. We’ll soon find out as I’m halfway through another version of this wreath.

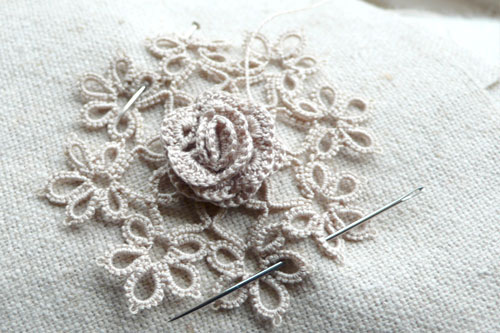
This was the other option incidentally. I crocheted this rose ages ago, I think with DMC Perlé thread and found it in a jar! Good colour match, but I thought it really was Time To Tackle Embroidery. (That said, it looks rather tasteful by comparison. Oh well.)

rose

The monkey in question arrived as a head and left as a fully formed monkey. It was him that took most of the time, to be honest – it’s amazing how long thy really take VS how long you *think* they take. I couldn’t get his mouth right AT ALL. This is probably the 4th or 5th mouth. In the end I used some linen thread, which was a bit random, but I’d tried embroidery thread and wool and both of them looked awful. Now he’s done, I think he’s quite sweet:

monkey_1

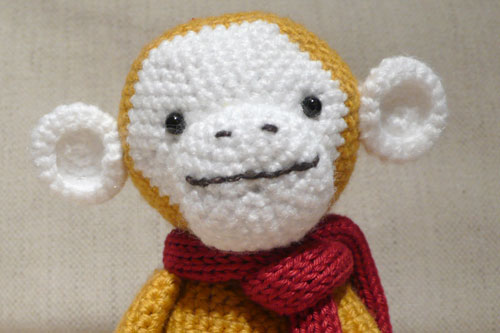
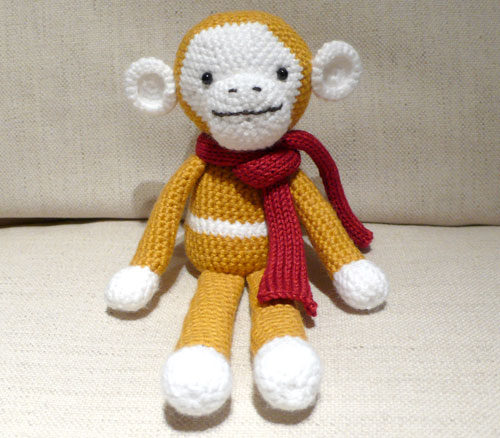
He looks kind of hopeful I think. I’ve said it before, and will no doubt say it again, but the placement of the mouth and eyes is everything when it comes to toys. Get that right and I swear it’s half the battle. And that’s a knitted scarf! The first ever scarf I’ve knitted for one of my toys. This monkey is a gift for my friend’s daughter who is one year old this week. She’s the one I crocheted a blanket for a year ago. I mentioned that it might be an idea for him to sit on the shelf for a bit, as I’m not sure how he’ll take to being chewed, but we’ll see 🙂

Yellow Monkey

Right. Better get on with the weekend. Enjoy yours!

Colouring in

springYou know I absolutely can’t wait for Spring. It doesn’t have to be warm, just sunny and bright with a few new shoots popping up here and there. Not sure where you’re reading from, but we’re all cloudy grey skies and snow in the UK at the moment. A few proper sunny days would be lovely…

spring2

I made this little chap last week. It’s actually an incorrectly tatted version of this pattern. I quickly memorised the pattern on the way in to work, but neglected to notice there should be a single stitch between each ring on the flower shapes. Missing the stitch means that when you get to the end of the flower shape, you only have one thread – to get the other on back in action, you have to close the flower. (Tatters – you’ll know what I mean… right?) Actually, I think it looks fine – although I had to block it to get it to lay flat.

My need for some spring colour led me to make it again (complete with mistake, as actually, I quite like it like it) in an HDT called ‘Summer Trail’.

summerIt’s size 80, and the ecru (kindly gifted by Katy) is size 50. There’s quite a size difference. Coloured threads are so odd. I look at photos of everyone else’s coloured tatting and think it looks lovely. Often, when I use colour I think it looks a bit over the top. I must admit I’m not keen on the orange/yellow in this thread, I think it’s a bit too much. The green in the centre calms it down a bit, but… I dunno. I need to find the right colour to stitch it on to, perhaps. I think white might make it look a bit fresher.

lavender

There’s never a good time to buy yellow yarn, is there? I mean really, what are you going to use it for? Not much, I reckon. Luckily, I was with a friend wondering through Liberty’s sale (as you do… not very often!) and spotted a lovely, reduced price ball of yellow wool. I had to get it – and doesn’t it look nice? Just a wee bit in the centre of my daisy. I love this pattern – I’ve been meaning to make it for ages. It doesn’t take long, and I bashed out a very wonky cotton bag to hold the lavender for the inside. The back is a basic granny square. Actually, it’s not even remotely square as I made up the pattern as I went along, and didn’t count properly! I think alternating a plain square with a daisy square would make a lovely baby blanket though.

In other news, I still need a new knitting project – a TV one. I’ve been thinking of making another Guernsey Wrap, because I love the first one so much. I’ve been wearing it ALL the time! Any suggestions appreciated. I also need to crochet a toy. A friend’s daughter is having a first birthday soon, and I think it would be nice to make something.

Best stop rambling and get on with it.

Another wreath!

lavender_bag

Less speedy than the last one! This is a lavender bag, tatted as a thank you to Katy for the thread she gave me. I had a bit of a panic about what to tat actually. I need to look for new patterns! As I usually tat on the train though, it’s not always possible. I like to do things I have memorised already (much less of a faff) – also, I wanted to tat something I knew would look nice. I do like the colour of this thread. It’s really close to the colour of the linen, and I think it looks good with the beads.

Katy also gave me some white thread, if you recall, so on the reverse are the flowers I tatted with the two colours together.

flowers

The threads are actually different sizes – which on freeform stuff like this is fine, but I spotted it when another Mary Konior pattern I was tatting started looking a bit tight. I adjusted numbers of stitches though, so all good.

I tried extra hard with the sewing on this one – it’s always a bit nerve-wracking making things as gifts. I think it turned out ok though.  Also, Katy has been decluttering her house this year, and I felt a bit bad about sending more clutter as she’s done so well, but I thought… well, it’s useful and will tuck in a drawer and make things smell nice 😉

Thanks again Katy. (Aren’t bloggers nice?)

Speed-tatted wreath

wreath


One of the things I like about crafty stuff is the seasonal rhythm. It seems to happen more in Autumn and winter with tatters perhaps, but I love that around september tatters often switch to autumnal colours, and tat leaves and pumpkins and other things. In the winter of course everyone switches to snowflakes, because if there’s one thing tatting seems to be made for it’s snowflakes.

I’m not sure what’s happened this year, but time has run away with me completely! I’ve either not had a seat on my commute or  it’s been really squished, or my hands have been too cold. I’ve been working late for the last month or so too, and so maybe I’ve just not had the right bit of my brain available by the time I get to the train. Anyway. No snowflakes. I also realised that I’ve not posted a single card as yet, and there’s one friend of my Mum’s to whom I usually send a snowflake. This year I thought I would finally get around to tatting this in green with beads and send this instead. It’s unblocked in this photo – I must admit I do like the organic shape of it like this. You can’t see how lovely and glowly the beads are in this photo, but they’re a really nice ruby red.

It’s tatted in size 80 dmc, and so there’s not stacks of beads. I know other people make this pattern with beads at every join, but it’s too hard to get a needle / double thread in a bead like this to attach beads to a joining picot. (I know if you don’t tat, that makes no sense, but just incase you do, that’s what’s going on).

Anyway. Just the one photo, as I need to get this blocked and try and see if I have any Xmas cards in the house at all. (It’s generally a blessing that I work away from shops, but occasionally a curse).

Happy Sunday! If you’re Christmas Crafting, hope it’s going well.

Race against the dark

photoshopped photo

It’s almost dark, so I had to race to take these photos – and I must admit, I’m not quite ready! That one above is a massive cheat in Photoshop, but hey, it looks pretty at least! It’s a little piece of test tatting I’ve squeezed in this week on the occasions when I’ve managed to get a seat on the train. Not sure what’s up these days, but seats are becoming a bit less frequent.

super nice

Look at these! A huge treat and such a kind donation from  lovely Katy at Creating Misericordia. They arrived in the post last week, so I got home at the end of a very long day at work to find them waiting for me. Instant smiles! I’m not 100% sure what sizes they translate to, but I’d say perhaps maybe 50? They’re not as thin as 80, but not as thick as 40, so I think something like 50 or 60. Anyway, super nice, and I love the more beige-y colours with the ecru…

realistic

This is a bit more of a realistic shot – I quite like the very subtle mix of the two colours together. This is a doodly pattern, but so enjoyable to do. I’ve started adding picots to every flower petal, which makes it more flexible to make up a pattern as you go along. Without them you get to the point where you quite fancy adding a join but have nothing to join to. As always, I could actually *plan* this, but… where’s the fun in that?! Hmm. I think  I might actually plan the next one… perhaps. Thank you so much Katy, a donation very much appreciated 🙂

autumnAll the hard work on this is done – had it not been about to get dark, there’d be a shot of it finished. I just need to stuff it and sew up the side. It would also benefit from an iron too. For this one, I stitched three sized of the square and then sewed on the tatting. Much better idea on slightly larger pieces as there’s more chance of getting the tatting centred. It’s a bit fiddly stitching the tatting on, but I am pleased with the way this has turned out. I worked really hard to get it looking as neat as possible, and I think it’s paid off. (This is a very close up shot – it wont be this wrinkly by the end! It’s Valdani thread incidentally – slightly smaller than 80 but not as thin as 100. I went off it for a while and have no idea why. I love it on linen.)

wrap

I’m still knitting every chance I get, too. This is the wrap – don’t worry, blocking will fix the edges. I bought some blocking wires in preparation and I’m so desperate to get this finished! It’s been really cold at work, and if nothing else, I just want to wear it. This is a rubbish photo, but it does look nice is real life. A great pattern – and really good for beginners. It looks quite complicated, so you get all the satisfaction of that, but it’s just knitting and purling. I’ve got about 74 rows left… The plus about this is that it’s not too bad as a TV pattern, if you’re careful. (That said, I’ve unpicked a few rows!)

All this aside, other big news is that I changed the blade on my rotary cutter. Have you got a rotary cutter? When did you last change the blade? SERIOUSLY. It’s like the fabric just jumps up and cuts itself. Why did I leave it so long? Two things in life you probably shouldn’t skimp on. A taxi late at night and a new blade on yer knife. (Especially when it’s only £3.00).

Have a good week!

Hey monkey! Show us your sock…

I know you’re supposed to put the most enticing photo at the top of a blog post, but it’s been a long day and this one made me laugh the most. Hello! There’s been a bit of a pause on posts recently as I’ve had no chance to take photos of anything I’ve made. I leave for work in the dark and it’s dark when I get home, and my stroppy camera hates anything but sunshine. I did manage to grab a few snaps this morning though, and so here I am.

I made the monkey up there years ago. It’s the second toy I ever crocheted actually, and sits on my boyfriend’s desk. The sock I made about a week or two ago, and it’s a mini Christmas stocking, from the bottom pattern here. It’s so cute in real life! It’s probably not the best knitting you’ve ever seen in your life, but it’s the first time I’ve used DPNs and I actually managed to make a decent job of mattress stitching it together. If you’re a good knitter, I think you’ve have it done in no time. I know the colours aren’t very xmassy, but it was a test really, to see if I could do it.

I made another version of the pouch of pain. Still not great, but better than it was. Annoyingly this one seems to show up the tightness of the colour changes more than the other one (it’s actually a little better in real life than it looks here.) The pattern suggests that you go up in needle size when you start the leafy design, but I don’t have that many knitting needles yet, so I couldn’t do that. It’s quite a bit smaller than the first one… I was tempted to line it with fabric, but it’s just not that great, so I don’t think I will. Anyway! Nothing ventured, nothing gained. Oh – and I did the increases this time, so the base is rounded a bit. Again, looks better in the flesh.

I treated myself to these lovely hand dyed threads from Yarnplayer recently. They’re size 80, and for tatting. I’m really looking forward to using them, although I’m undecided yet as to what I’ll make. You have to be a bit careful with variegated threads – if the pattern is too complicated it can end up looking really confusing. I still think this is one of my favourites. That said, it’s getting to snowflake making time again. Gah! I was going to start early this year.


I’ve been making this again on my commute. Almost there, and then the ends to sew in. It’s in the Valdani quilting thread, which I do have a certain affection for. Occasionally I panic as I think it might snap, but that aside, I like the fact it’s ‘dull’ – there’s no sheen to the thread. I made a lavender bag earlier this year with the same pattern, and actually I love it. Something about this colourway on linen works really well.

Aside from all that, I’m still knitting my Guernsey Wrap (you can see the beginning of it here). I’ve become a bit desperate to get it finished now as winter really feels like it’s arrived, and I’d like to wear it! I’m over half way, but I need some dedicated time on it. I was hoping today would be the day, but I got sucked into day-job work instead. Haven’t managed to fit any sewing time in either, but I did buy some beautiful fabric a few weeks ago.

So much to do, and so little time! Better get on with it.

Time suck!

Guernsey Wrap

I am still alive! When I started this blog, I didn’t used to do *that* much crafty stuff – hence the name. Then I gradually got more and more hooked. At the beginning of this year I was trying to post every week (or so) and now look. A month’s gone by and not a word. Well, it’s been a busy month I guess – I went to Venice to see a friend, (and ride in a helicopter) and work’s been busy. But enough of that.

Knitting! I’m absolutely in love with this pattern, by Jared Flood (which you can see above). It’s pretty clear I’m not alone – if you look it up on Ravelry you’ll find everyone else loves it too. It’s such a good beginners pattern! It’s just knitting and purling – and watching the patterns form is really addictive. I’ve seen some people stress with getting to grips with the chart – but just incase you’re going to make it, I think the most important thing to know is that every row starts with knit 3. Once you understand that, you’re off. It’s really so nice to knit.

I followed the advice of other Ravellers in terms of yarn, and I’m making it in Cascade 220 wool, in charcoal grey. I bought the yarn a while back, but have been forcing myself to finish this first…

waffle scarf

This is the Waffle scarf I made, with the massive ball of yarn I got for Easter, from my mum. It’s not a brilliant scarf, but it’s certainly the very best I could do. It was also really good practise for getting to grips with knitting. I used an adaptation of a simple repeat pattern on Ravelry – and you can find it here. If you dig about to see what other people think, everyone says the same thing – it curls up at the edges like crazy! Still it’a great pattern for a beggining beginner.

The Guernsey Wrap needs to be blocked to within an inch of its life, I believe. That’s what everyone says – and it should make the edges nice and neat. I’ve got a hell of a long way to go before I get there, but I’m excited to see how it all turns out. So stay tuned.

In other crafting news – I got a Kindle for my birthday. There are two things about this (well, three if you count me telling you how much I like it). The first, it stopped me train tatting which is very bad. That said, recent busy times at work have made me start again. Sometimes when my head is whirring with the day’s events I can’t read a book, digital or otherwise. That’s when train tatting comes to the rescue. It’s brilliant for calming a buzzing brain. I’m making a pattern I make all the time, so all I have to do is count. It’s perfect.

The second Kindle thing; I need to make it a case! Trouble is, knitting has just eaten up my weekend time. I also have lovely fabric I got for Christmas which I need to make a crafting bag/tidy with. There’s just never enough time, is there?

EDIT: PS – By the time I came to start the wrap, I’d forgotten how to cast on. The pattern suggested the Long Tail method, which is handy, because my mum taught me that. Or it would’ve been handy if I could’ve remembered it! You Tube helped out – and this video is quite good.

Tatted train-doodles make it home

blue

It’s amazing what a difference a camera can make. Mr Occasional Crafter took the above photo on his camera, as for some reason mine just wasn’t really cutting it. It’s far too blue, but I decided not to correct it, because I love it! It makes my tatting look amazing, I think.

Back to harsh reality now, and the photos I took. Sorry!

pins

I’ve continued to ‘doodle’ with my tatting recently, which I’ve rather enjoyed. While one part of me worries that I’m not tatting with a purpose, the other part is quite enjoying wingin’ it. I’ve been tatting daisy chains again – or rather daisies, and then joining some as I go to create more solid shapes. The plus side of this is that it really shows how useful split rings are – without them I’d’ve needed to cut and tie a few times, the minus side is that I could really do with actually planning it a bit to make a more fluid or useful shape.

I’ve been using a lovely silver grey DMC thread (size 80), which tats up beautifully. It seems to have really good stitch definition for some reason – almost more than other colours – and I’ve loved using it. This weekend I decided I’d stitch it onto… *something* and then decide what to do with it. For once, I decided against linen – maybe the tones were too similar, I’m not sure, but it really didn’t look that good. I almost went with black, but at the last minute switched to grey. That old grey sheet I saved from the charity shop is really earning its keep!

I pinned it out before stitching it, as you can see. Then I unpinned it as I stitched and completely changed the arrangement bit by bit. It seems appropriate. Tatted as a doodle and stitched as one too.

Layout

Sorry – the photos really are all over the place in terms of colour, but at least you can see the layout here – and the beads. I sewed the lighter beads on first (they’re actually a silvery grey), and then at the last minute, after realising I had some, I sewed the black beads on for some contrast. I wasn’t sure about them initially, but actually I think they work quite well.

close up

I’m not sure yet what I’ll do with it… maybe a panel for another drawstring bag? It’s a bit big for a lavender bag. Actually, maybe I could use it as a panel on a fabric basket? I’ll have a think. All suggestions gratefully received!

Either way, I really enjoyed making it. Also, it does look rather nice. So nice in fact, I’m quite surprised I actually made it. (I’m not showing you the back though).

In the pink

tatting

I’ve had a very nice afternoon, but by the time you read this, it will’ve been a week ago. I’ve been making a present for my mum, and I know she reads my blog sometimes, and so I wont post this until the gift is given!

bag

This is not quite what I was intending to make – I was going to use the daisy chain to decorate this, but it wasn’t working that well. After some consideration I decided to decorate the bag with a different piece of tatting, and add some beads which would co-ordinate with the top section of fabric.

tatting and beads

I love the beads and the fabric actually – they’re a nice muted sage green. I sewed the beads on as I stitched the tatting to the fabric, which worked quite well. Biggest problem was finding a needle small enough to go through the beads – I keep buying needles and can only assume that the Borrowers get to them before I do, as I can never find them!

I really like the piece of tatting on here – I was unsure about it before, but I think it looks perfect on a bag like this, embellished with beads. (I’m tempted to make another one now! It was from this pattern, and looks rather different here.)

pink

And there’s the pink! I used a pink lining for the inside, which just peeps out at the top. I’m really pleased with it, as I think it just adds something a wee bit extra – I love how muted the rest of it is, with pink to add some contrast.

I had to hand stitch around the top as the bag was too small for machine sewing. It’s not perfect, but I did my best. I hope she likes it.

Monkey (and other) business

Image

I meant to post something here last week, but by the time I got around to getting started it was too dark to take any photos.

Another mixed bag this week – odds and ends of things. Above is my current train tatting – still on the daisies, but this time pink. I just loaded up the shuttles with what looked like a sensible about of thread, and will carry on until it runs out. It’s lovely to tat like this – there’s a few onion rings in there as leaves (not shown above), and a few standard daisies as well. It’s just a bit of meandering about, no set pattern, which is quite nice for a change. I was thinking about getting some gauze, the kind people makes scarves from, and tatting an edging for it… I thought it could be a good ongoing project, perhaps?

Image

In stark contrast, here’s a new drawstring bag I made! For christmas I received an extremely generous gift – a voucher for the Make Lounge. I spent a long time thinking about the type of class I’d like to take, and in the end, decided on screen printing. I wanted something that would be fun, but that I could possibly do at home. (I thought long and hard about sewing, but classes are all taught on an electric machine, and it felt weird being unfaithful to my Singer!) Then of course, I needed to think of something to print, so drew a monkey, and some elephants:

Image

Now, the thing with this type of screen printing is that you have to cut it by hand — and we didn’t have time to do repeat patterns, and so I adapted the characters a little on the night. (I prefer the planned monkey, but went a bit nuts and cut it differently by accident!) 

Image

Unlike everyone else, I took some calico with me, and screen printed a couple of extra prints. I wasn’t too sure – I’m still not too sure – what to do with them, but once you’ve got the screen working, seems a bit nuts not to make the most of it. I pre-washed the calico, and flippin’ eck, it’s not easy to iron, is it? Yes, I DID iron it while it was still damp, but to no avail. Amusingly, I saw that Patch had the same issues last week.

Image

They gave as a little bag to screenprint, which you can see on the left. It’s really cute – child sized. I also have a tea towel with a monkey on each end.

It was a great evening – amazing how fast you can relax and forget about work and all your troubles when you have something fun to do! I’m not sure if I will screen print at home – does require space, and creates a lot of mess, but it did get me thinking about lino printing, which I’ve not done since college, and used to love. I know you can do that with a roller for the ink and the back of a spoon for a press, so we shall see…

Image 

And finally, I thought I’d use up a few scraps, and try a log cabin lavender bag. As you can see, this ended up rectangular rather than square as I decided it was getting too big. The patch with the ‘7685’ on it is the selvedge of the dotted fabric, which I quite like. It’s an odd little thing, but quite cute in real life. Now it lives in the monkey bag with the other scraps and makes them smell nice.

Hope you’re all having good weekends!