Quilt invaders

colour_1

Its been another quiet weekend here as my other half left last Thursday to work in Barcelona for a few days. I mentioned previously that I’ve been working from home for a few weeks – I’m actually working in the kitchen, hooking up my laptop to a monitor which seems to’ve decided to move in. I’m not sure how we got from a nice empty (usable) kitchen table to one half full of tech, but it’s been handy for me, so I probably shouldn’t complain.

pixels

Its a nice new monitor, and my boyfriend has been bugging me to make a cover for it, to stop it getting dusty on the rare occasions we’re not using it. I’ve got an awful habit of making things we really don’t need, and nothing we actually *do,* so I felt obliged on this occasion to come up with the goods.

On Thursday I decided I knew what the weekend project would be, and hurriedly placed an order with M is for Make.

The fabric arrived on Friday, which was spectacular service and just what I’d hoped for. Its hard choosing colours from snapshots online, but I went with Kona Cotton: Lime, Emerald and Coal. The colours are really intense. I was super happy when I opened the envelope—and wondered why I’d not considered making a plain quilt before. I think I might try it. Anyway…

Can you tell what it is yet

Can you tell what it is yet?

diagram

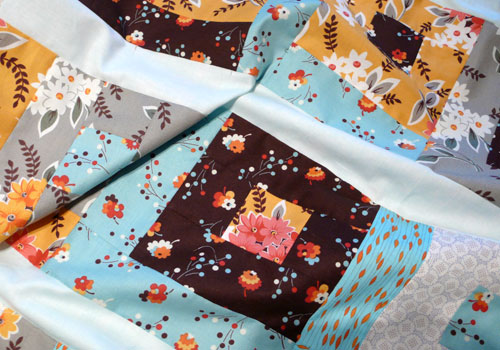
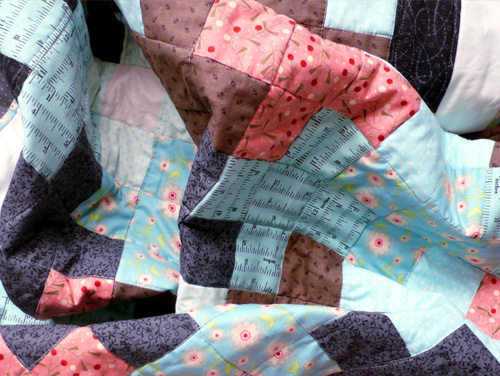
I chopped the fabric up into 2″ squares, and used them as pixels. I even made a proper effort and plotted out the pattern into six different nine patches, plus extras. (Although not very neatly, as you can see). In the unlikely even you want to do something like this yourself and the pattern would help, leave a note in the comments and I’ll email it over (I’ll tidy it up first).

invader

Having plotted it out, piecing it was really fast. It’s easy to chain the ‘pixels’ together as you go, so for example, pixel 1 and 2 of the first square, followed by 1 and 2 of the second, third, fourth, by then you can add the 3rd pixel to square one, etc. Before you know it, you have the first line done.

bigger invaderI decided it would be more interesting if the invader wasn’t central, so pieced him over to one side. I’d love to share my measurements but I didn’t really make any…

strip

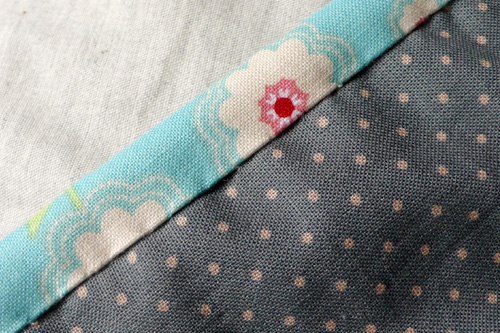
Which is why after I’d pieced everything together it turned out too short, so I had to add an extra strip on the bottom. (I’d bought this fabric at the same time, to co-ordinate but until that point had no need of it.)

back

I’d love to share my method for putting this together, but it was awful. Frankly I have no idea what I’m doing. The back (seen above) needs to be shorter than the front to allow for cables etc, which completely flummoxed me, I’ve got no idea why. Looking back, I should just’ve stuck to a method like a bigger version of the needle case with a pocket but I went down some insane route that I can’t even begin to describe. Anyway. Don’t do that.

inv5

Here’s a pretty terrible shot of it in situ, with what looks like avery unhealthy cheeseplant in the background. Don’t worry, it is actually healthier than it looks…

Overall, it’s functional, I love the colours, and I’m very pleased with the invader. I’m a wee bit frustrated that I did such an awful job of putting the rest of it together, but you live and learn. It’s also put me in more of a mind to make the pixel skull quilt that I promised to my boyfriend an age ago…final


Bags of joy (or craft as therapy)

bag_1

It’s been a weird month or so. My partner has been travelling a lot and for a boring health reasons (herniated disc) I’ve been stuck at home. Like many people who work in London and live in a town outside I don’t really know anyone locally. The last few weekends have stretched out endlessly – but in a bad way. When you’re feeling super-cheerful, a free weekend feels like a brilliant opportunity. When you’re a bit fed up, it feels like it will never end. Social media doesn’t always help – perfectly posed photos of friends having amazing times, going places and doing things, and there you are home alone, climbing the walls (or you *would* climb a wall, if you were able to stand up).

There’s a lot been written and researched into the therapeutic effects of knitting and/or making things; here’s one article. Google and you’ll find loads more. I have to say I agree completely. I find that tatting and knitting both require counting, which calms a busy brain, and that sewing is good because often the projects are started and finished in a day and you really feel like you’ve achieved something.

There is no physical position I can get in that is pain free at the moment (can’t sit on the sofa, can’t lie down) – BUT on the upside, the closest I can get is a hard chair at the kitchen table, as long as it’s not for too long.

I decided this was the perfect weekend to make the most of a few things aligning: free time, no interruptions, a free kitchen table. What did I plan on making? Another zip top bag. What did I make? A drawstring bag!

bag_2

I’m really pleased with it, even if I do say so myself. I bought this the Elementary Mini Charm Pack from Moda just before Christmas. I’d sort of said that I would make my partner a quilt, but the one I have planned needs some black fabric. I bought the charm pack as a tester to see what would and wouldn’t work. I must admit, it’s a really nice pack. You get 42 squares in total – which when they’re all laid out, is quite a lot.

The zipped pouch I was going to make would only take 4 of these squares and when I put them together, it seemed like a shame. It felt like it would be nicer to put a few more together and make something bigger.

bag_3

I made this drawstring bag in 2013, and I use it all the time. It’s quite big, and of all the things I’ve made, it’s the thing I enjoy using the most. (Although I think that could be because most of the things I make aren’t that useful!) It’s tatted and embroidered – which despite being a bit flowery for my tastes I really like – and thinking about it, I wonder why I’ve never repeated? Anyway. I decided to make another bag roughly the same size.

bag_4

(Sorry for rubbish iPhone photos – the blank patchwork square actually has a pattern on it!). I didn’t measure anything – I just started with the charm squares and went from there. I ALMOST had a wobble when the charm squares were put together and the grey border added… would make a really nice quilt, but I decided I wanted to finish something there and then and actually, I have a use for the bag already. The white fabric with tiny blue stars was a speculative purchase ages ago, the grey fabric was in my stash and I managed to cobble just about enough calico together to line the inside. The ribbon handles I found in the back of a drawer – I was really pleased as they’re not a bad colour. I think they’re the handles from a posh carrier bag. (Always save those ribbons and cords, they’re usually just the right size for *something*).

bag_5

In terms of construction, I used this tutorial again, I quilted the main section after the patchwork was complete and before I started putting the panels together. By which I mean I stitched through the front straight on to the batting, with nothing behind it. The top grey section has iron-on interfacing to make it stronger, as it’s the bit that gets the most stress. Inside it’s just basic calico, which is heavy duty enough, and cheap, of course. I actually didn’t do a *terrible* job of that top stitching on the outside – but yes, I was too lazy to hunt for a more discreet thread colour.

And thus, mission completed. Just the right project – took long enough, but not too long. Required the right amount of sitting, but enough to keep that spine moving, as you need to get up and iron things, or chop things up. It also needs a bit of thought, but not enough to make you worry about it.

If you need  a project to cheer yourself up, and you like sewing, I would recommend it. (If you like knitting, I would recommend a hedgehog.) I’m hoping though, that if you are sewing things, you’re happy both before *and* after you start!

Here’s to it, us and making things.


Patchwork and tatting to beat the rain

quilt_3Hello! It’s a wet and windy weekend in the UK, and due to my other half being away for work I’ve had time to get on and make an eye-wateringly cheerful quilt top, in record time. Not only that, but it’s much less wonky (so far) than my previous quilting efforts. I bought this fabric at the Knit and Stitch show in Ally Pally (London). It was a pack of quite tightly-rolled fat quarters – so you couldn’t really see what you were getting – which worked out at £12 a pack or £20 for two. As a lady next to me was contemplating a pack at the same time, I said, “let’s buy them together and we both save £2”, which is what we did.

quilt_2

Sorry – terrible lighting, don’t really have anywhere I can photograph a quilt.

I had to improvise with the pattern a bit; originally I wanted it all to be colour and pattern with no plain solids in there, but I used up all the fabric and it was a bit small so I added the sashing in. The sashing is actually a pale turquoise left over from quilt two, which is quite handy.

quilt_4

At the edge of one of the pieces it said “Flea Market Fancy”, and I was just in the process of discovering that the collection was based on retro designs, when my boyfriend arrived home, looked at it and said ‘Nice… have we gone back to the seventies?” It *is* a bit seventies, but I still love how bright and cheerful it is. To be honest, they’re not the usual kind of fabrics I’d choose.

Which leads me to the William Morris quilt, which I started here. Believe it or not, I’ve actually finished the top of that too, just not had time to take the pictures. Next I need an expensive trip to the quilting shop, to buy batting and backing fabric.

quilt_6

Actually, looking at the light on these photos, it doesn’t do it any favours. I promise you it’s nicer in real life! This was a pile at the start of Saturday. It was a lot bigger by the end. For once, as I was making squares, I measured them up and trimmed them down properly.

tatting

On a more restrained note, I also got a little bit of time to tat the other week. This is a new pattern that I’ve been working on. Not there yet actually, but almost. And on that note, better run. More things to do.

Hope you had a good weekend too.


No time like the present…

needle cases

I made these needle cases about a month ago. They’re very wonky, and I just rushed in and made them without thinking really—which I must admit, I really enjoyed.

scraps

I used up lots of little scraps and just made it up as I went along. I like the fact that one is really bright and cheery and the other…

case

Feels a little more muted, a little older, perhaps. I was of course using up my tatting; thought it might make a change from lavender bags! I made the brighter one second, and actually remembered to put some pockets in it. To be honest, had I been thinking I’d’ve added decent pockets to both, maybe in different orientations. That’s the only thing with being spontaneous, afterwards you think of all the things you could’ve done. That said, I enjoyed making them and I did actually need a needle case. (Although maybe not two.)

inside

The felt inside is SO cheap and nasty! It’s awful – thin and stretchy. I must actually buy some decent felt. Anyway – that’s not the point of this picture – the point is I used the scalloped stitch on my sewing machine to make the ‘pages’ look a bit nicer. It’s the first time I’ve used a non-standard stitch on a sewing machine, so that was very exciting. I’m still alive to tell the tale.

floor

This is what the kitchen floor looked like until about 10 minutes ago.

And the living room floor.

Why work in one room when you can turn the whole house into a tip?

About a year ago I bought a selection of beautiful William Morris fabrics. I love every single pattern—but to the point where I was thinking that I would never ever use them because I could never do them justice. I’ve looked at a million patterns, simple and complicated. I’ve decided what I’d do and changed my mind a million times. You know the saying ‘money burns a hole in your pocket’? This weekend the fabric finally did that to me and I just decided to get started.

The patterns are complicated so it needs to be a simple quilt design. I decided on a strip quilt and started cutting strips. Until I came across one pattern that would be better as a traditional patchwork, so I cut some squares. Then I cut some more squares. Then I couldn’t decide *what* I should do – and of course cursed myself for ‘rushing’ in. (Despite the months of deliberation).

Anyway:

block 1

In the end I decided to make blocks that are all this size, and then I will put the blocks together

block 2

I think this should work. It should use up the bits I cut at random and I can make each block relate to the previous one or any of the others and shuffle them about as I go along. I hope it’ll work anyway…

The good thing being that it’s not *for* anything. I like making quilts for snuggling up on the sofa, so whatever happens it’ll work for that. And once I’d decided that’s what I was going to do, I quite enjoyed it, and that is the point of it, really.

Sheesh. Why do I make everything so complicated?

Hope you’ve all had good weekends.

(Also, thanks to the new people who are following me. Feel free to comment, I don’t bite 🙂 )

2013; tatting, sewing, travel and monkeys

tatting with beads
Well, hello! Happy new year to you and yours!

If you’re a WordPress user you’ll’ve received an end-of-year review of your blog. I was shocked to see that I’d only posted 19 times last year! I thought surely I’ve been busier than that? I’ve never done my own end-of-year post before, but as it’s nice and warm inside and horrible out there I thought today might be the time to start, so here goes. A quick look at what I actually did do last year…

Tatting
As you can see above, this was the year of the bead! I found a hook small enough to work with seed beads and size 80 threads, and there’s been no stopping me! I also finally worked out how to get the beads to pop above the chain rather than in them. It seems once I’d started, I couldn’t stop.

r_self
I also decided to try and work on my own patterns this year. Admittedly I only ever got to do this on the work commute, and refused to use a pen to plan things out first, so I only got this far, but I had fun anyway! I finished an edging pattern, which I made available here – and I even spotted someone using it. I do plan to continue working on my own designs this year, so we’ll see how that goes.

Trips abroad
This was another year where living in Europe brings huge benefits! Nice places to visit and nothing to far away. I was lucky enough to visit (clockwise from top left):

Barcelona –  A lovely, relaxed trip with old work colleagues who have become friends. A visit to the Sagrada Familia was a real treat; it’s the first time I’ve been back since the new windows and roof were finished. The colours and shapes are really breathtaking.

Skelleftea, Sweden, for work. This was a beautiful place, and the first time I’ve experienced 24 hour daylight! I was made so incredibly welcome too, met some really interesting people and had some great food.

r_travel
Venice – one of my best friends lives in a town just outside Venice, and so I spent a week with him. A great week of hanging out, visiting the Biennale, and enjoying/melting in the boiling sunshine.

France – my partner’s family live here, and so we visited his family for Christmas. The photo is taken in Villebois-Lavalette. I love this chateau – it looks a little bit like one you might draw for a children’s book.

Monkeys
Yes indeed, where would we be without crocheted monkeys? They continue to be my go-to gift, although I have a feeling I might’ve made everyone I know a monkey soon! I actually made 5 in total, I think – there’s a twin for the one on the top right. I also made two bears.

r_monkeys

Sewing
The reason I started using a sewing machine originally was to try and make use of my tatting. My obsession with lavender bags didn’t abate in 2013 as you can see! I’m still not sure there’s a straight edged one among them.

I also tried my hand at embellishing with embroidery, which on reflection, I like a lot. I used the piece on the top right for a bag.

r_sew

And finally, I managed to shorten a very light pair of curtains, and finish my second quilt. Phew!

Maybe 2013 was busier than 19 posts suggests? If you stuck it out this far, thank you for indulging me. And now, I *think* it’s stopped raining for 5 minutes. I’m going to rush out for a short, damp run, while I can. When I get back, I still have a friends baby blanket to finish.

RUN!

Quilt Two: done!

QuiltSo, I’ve finished my quilt at last! It was so close to being finished last Sunday night. I had about 20 cm of hand binding to finish, but needed to reload the needle, and it was just too late in the evening. I finally managed to get the time today.

There are some spectacularly wonky lines on it, which I’ll try and avoid showing you, but despite that I actually really like it. Don’t get me wrong, it really does have issues with wonky quilting, but I know for a fact that I just couldn’t’ve done it any better on the little machine I was using. And more to the point, I really enjoyed making this, which is the point of it all… right?

quilt close upThe colours are very different to the previous one — that was all browns and more natural colours. I’ve used up some of the brown from that one on this too, but mixed it with turquoise, pink and grey. I actually had most of this fabric knocking around the house — except for the dark outer border, which I bought after a rather stressful search at the knitting and stitching show. Who would think it would be THAT hard to buy dark grey fabric with a subtle pattern? Sheesh! You’d think I was looking for the still-glowing feathers of a flaming firebird! (I’ve been reading Russian fairytales recently). Thankfully my shopping buddy spotted it right at the end of the day and solved all my problems.

quilt distanceWhen I planned this out, it was more evenly tonally spaced, but every time I packed up sections after a session, I packed it differently, so every time I had to lay it all out again from scratch! (I know, I know. Can’t be organised *all* the time.) It was patched together using the 9 patch block umm… plan. So three rows of three and then stitched up from there. I like this as a technique – and there’s a million tutorials on YouTube for it.

back

This is a rather terrible shot of the back — but you get the general idea. I was doing everything I could do use up what I had. I’m not 100% sure the blue-grey goes with it, but quilts are supposed to be a *bit* mix and match… aren’t they?

bindingThis is the ladder stitch I used to hand bind the back. I came across this tutorial, which is so simple, obvious and great. Previously I’d just used whip stitch or ‘tiny stitches’ as some tutorials say, but this is so much better! Seriously, you can hardly see the stitches. I’m not sure what it is, but binding is my favourite thing about the look of quilts. (Not the making of). There’s something about a quilt’s binding that just makes it look extra cosy:

binding 2

This is both quilts together – I use the pinwheel quilt a lot in the evenings when it’s a bit chilly. Slightly worried that my boyfriend has started calling the new one ‘his’. I did say I’d make him one – not sure this is it though…

bothNow – the reason I made this quilt in squares is because I bought this at the quilting show earlier this year, with some birthday money from my Mum:

fringe maker

Sorry – terrible photo, the light’s been all over the place today. It’s a fringe maker, and I got mine from the quilting show, but it looks like you can get them on Amazon too. Oh my god – if you’re anything like me and can’t measure things or hate measuring things—or if by the time you’ve cut it it’s nothing like the piece you actually measured, this is AMAZING. It’s got a slit for your rotary cutter every 1/2 inch. Just line up the edges with the edge of your fabric and away you go. I love it. (They’re not paying me to say this, but I wish they would.) It made chopping up the squares for the quilt super-easy. So there you have it. Get one.

Other things learnt while making the quilt:
• Quilting straight lines is harder than quilting wiggly ones. I reckon people quilt wiggles as a get-out-of-jail-free card 😉
• If you’re rubbish at quilting, all-colour quilts make life harder. The pinwheel quilt looks neater in real life, because I quilted in cream, on the cream sides of the pinwheels. This time, there was no colour thread that was ideal as it had to cross both light and dark colours. This means that when your lines are wonky, they’re more noticeable.
• Use ladder stitch for binding.

blanketNow I need to get back to knitting a baby blanket. This has been a real pain. The cotton is really splitty, and… I dunno. It’s just been misbehaving. Trust me.

Also, like a lot of tatters at this time of the year, I’m furiously tatting christmas snowflakes! Panic!

See you soon.


Bags, packages and baggages

bag

Hello! How are you? Hope you’re ok and not too hot. If you’re not in the UK, it’s actually sunny here at the moment and it’s not really something we’re used to – or mentally equipped to deal with (!). Rain is forecast though, and so I’m sure normal service will be resumed shortly.

I made a bag, as you can see. I kept looking at the tatting plonked on top of that red fabric shoved in a box and I decided I should do something with it.

tatting

I started with just the border, then decided I actually really did need a drawstring bag to keep some stuff in, so  took the plunge and made the whole front piece – to match the size of a drawstring carrier bag I was using from Gap. Then I thought I should have some fun and I patchworked a section for the back too, and quilted them.

patchwork

It’s so cosy with the quilting I wish I could get *in* it. I must admit, I really did enjoy making this. It was something I wanted, with fabrics I liked – and as I was making it up as I went along it was really low stress. I usually enjoy all the crafts  I do (otherwise, why do them?) but often I’m learning something or testing something out. With this, I just made it for the hell of it and planned it as I went along. As a final touch I added interfacing to the fabric at the top to make it a bit stronger, and the cord is reused from an old in-flight bag, from Virgin airlines. I think I could do with an even bigger bag now, and so I’ll make another one when I get a chance. It was nice to be able to use that tatting too, I’ve had it for ages now and this feels like a good use for it.

I must admit, I was a bit fed up when I wrote the previous post. I think I needed a holiday, which is lucky, as I’ve just had one 🙂 One of my closest friends happens to double up as one of my most distant friends, and lives just outside Venice. I flew over last Saturday, and got back on Friday. We had a lovely time, chatting, watching a STACK of TV, eating ice cream, deconstructing our lives, finding no answers and drinking spritz. We also went to the Venice Biennale and saw some art. Well, a lot of art actually. And Venice itself is of course, beautiful. If you think it’s hot in the UK, boy is it hot there.

crane

It was also my birthday on Friday, and I arrived home to a brilliant and thoughtful package of crafty stuff from another good friend – this one a bit closer. Umm, I have an admission to make. I really like cranes and huge building sites. There’s something about them that just looks so alien – I think they’re fascinating. Often I walk through the city (of London) on the way home from work and snap some of the buildings-in-progress. The one above ‘The Cheese Grater‘ being a particular favourite. Why am I telling you this?

crane fabric

Because my friend bought me this fabric, which I think is hilarious! It really made me smile. I’m not sure yet what I’ll use it for, but something good! She also bought me some really lovely striped squares from deckchairstripes.com, a great looking book on bag making, some notecards featuring sloths (another favourite) and THIS:

measure

A beautiful bag she’s made (with seams far straighter than mine 😉 ) and a stitch counter, like the one I was admiring way back in March! I opened this part of the present thinking how nice it was that we’d made eachother bags, and nearly fell off my seat to find this inside. I’m really very lucky – not just for the gift, but to have a friend that would go so far as to notice I’d even liked this in the first place and to track it down. I still can’t believe it.

And finally, the Little Blue Monkey went off to his new home the other week, complete with a nice red hat, and giant pom-pom, and was very well received. All is right with the world.

hat


Going nowhere fast…

MonkeyI don’t know what’s going on at the moment, but it’s taking me forever to get anything done! These poor monkeys have been waiting so patiently to be finished, I feel a little bit guilty. The joy of making two monkeys at once kind of hit a snag when I realised I had to make EIGHT LIMBS. E I G H T. And then sew them on. Every time I get to the sewing arms, legs and heads on I remember what it is I *don’t* like about amigurumi. That said, it is nice when they’re whole.

two green monkeysLook at them! They’re a really nice size actually. They fit comfortably in your hand, and feel oddly delicate, but firm. The fabric this cotton crochets into is pretty sturdy, but there’s something about the size of these fellas makes you feel a bit protective towards them.

One has a scarf, the other has a scarf-in-progess. The scarf in progress is a simple 2×2 rib. I do love the fact that I can knit them scarves now (Thank you, Mum!) It always felt like a bit of a cruel blow that you spend so much time making them and then you’re still not done – you have to crochet them a scarf as well. (Monkeys always need a little accessory. It’s a very unloved monkey that gets sent into the world without one).

familyUmm, yeah. This is a little family, it seems. The littlest one is here to stay, the orangey one does fit rather well on the bookshelf, although is considering leaving home, and the two green ones will be going somewhere, when I’ve decided where. I started making the green ones some drawstring trousers, but there was a hiccup with the sewing machine, so I need to do a little maintenance work first. These are all cotton, where as the yellow one I made recently was wool. Gawd. I said a long time ago that this blog should probably change its name to ‘Occasional Monkey’, perhaps I was right.

Anyway. Yesterday I went to the Creative stitches and Hobbycrafts show at ExCel, in London, because I was lucky enough to be  given a free ticket. (Thank you, Mum!) My friend and I had fun – but it was nowhere near as good as the Alexandra Palace show, which I still think is the best of those kind of events. The stalls were all okay (not widly exciting) but I did enjoy the Royal Schools of Needlework display, which had examples of students’ sketches and works in progress. (My friend Jane took a lovely photo of the blackwork). I keep a sketchbook / notebook for work, but I’m starting to think I should work out a way to make one for fabric / thready things…

sketchThen I’d have somewhere to put the odd things like this which end up stuffed in various boxes around the house. This was me trying to work out a smaller version of a vintage pattern, and then switching to something else entirely (above).

oopsAnd this is me being an idiot and mis-reading a pattern. What do people *do* with things like this? Do any of you do scrapbooking, or have kids that would like less-than-perfect things to collage with? I dunno. Let me know. Anyway, I digress.

As well as the Royal School of Needlework display, there were some lovely quilts on show. I loved the rich colours on this one, which is actually evenly lit, but has a natural gradient in the fabrics, making it look like its moving from shadows to sunshine:

colourThere was also a display of smocks and smocking, which I think was from a collection owned by the WI. They were absolutely beautiful, my favourites being all one colour, natural linen. It was hard to get a photo as the weren’t well lit, but this is the kind of thing:

smockingSmocking is actually on my list of things to try. (It’s a long list, mind you). Oh – would you look at that, a nice tutorial! It was the work of this lady, who made me realise just how beautiful this kind of thing could be. Actually, looking at it now makes me want to chuck everything I’m working on out of the window, take a week off and learn how to do this *right now*.

We left the show, had lunch and then headed back to Somerset House for the the Walpole Crafted: Makers of the Exceptional 2013 show. (I say ‘headed back’ as we were only there a few weeks ago). This was a nice afternoon mooch – in the same space as the previous show we’d seen. Again there was some thought provoking work on display. I did love the colours on this Fair Isle Knitting, by Mati Ventrillon:

faire

fair_blueThere’s so much stuff to try, isn’t there. Gah! As always, so much to do and so little time.

There was one other thing that was a feature of yesterday – and today. Sunshine! We had some sunshine. Yesterday finished off with a lovely long walk in the sun, through central London and Green Park, and today a lovely walk in the country side – I spotted primroses, daffodils and even a few lambs. I thought I should make note of it here – at least then if we don’t get any more for a while I can look back and remember how nice it was.

Actually, despite the worrying title of this post, I’ve had a lovely weekend. I hope you have too.

Found: crafting mojo

kindle case

If there were Olympic medals for ‘having a bit of a think’ I would surely get one. I got a Kindle Touch for my birthday at the beginning of August, and I’ve been having a bit of a think about making a case ever since. You know what? I just finished it about 10 minutes ago! That’s it up there.

I really ummed and ahhed about what fabric to use. I actually thought this patterned Amy Butler fabric was too nice for this – and then I realised I was being an idiot. I bought the plain and patterned fabric together, on a whim, from an offcuts basket. They’re lovely, of course, but there is no über project – is there? If we spend our lives waiting for the perfect project to use this fabric or that button, we’ll be waiting forever. I’m not saying ‘waste fabric’ but… I don’t know. There’s no perfect project, buy stuff you love and enjoy using it.

pocket

So anyway, now *that’s* out of my system – the Amy butler fabric is a pocket! It’s to put the cable in. If you do a bit of a google for Kindle tutorials you’ll see this a lot. I like it. To be honest, there are loads of tutorials out there, so I used half a Kindle tutorial and half this iPad cover tutorial (which is really good). I considered more complicated options (this tutorial looks brilliant) but frankly, I feel like a lost my crafting mojo a bit and I just wanted to make something super uncomplicated. I didn’t measure anything – which lucky for me worked out ok – and nothing was straight! But y’know. No one died.

lining

I’ll let you into a secret though. The Amy Butler fabric, the co-ordinating solid brown… It’s all very tasteful. And then I thought maybe it’s a bit TOO tasteful? So the lining inside is that slightly lurid green with multicoloured flowers! It doesn’t match at all and I love it. The button came free with an Etsy order ages ago and was a suspiciously good match too.

handy

Last time I went home, my mum gave me this. It’s a little plastic case with a load of different threads in – she said she picked it up somewhere as it was quite cheap and thought it could be useful. As I was about to embark on this epic journey, I realised I didn’t have any brown thread. I cannot believe what a perfect match was inside this box! It might not be the kind of thread you make an heirloom gift from – but if you’re prone to making small projects on a whim (even if it is a well pondered whim) then this is perfect. It’s just a small amount of each colour to tide you over. And it includes needles. Amazing. What a brilliant thing to have knocking about.

So there you have it, a new Kindle case. It’s a bit wonky, obviously – but I couldn’t be happier.

Monkey (and other) business

Image

I meant to post something here last week, but by the time I got around to getting started it was too dark to take any photos.

Another mixed bag this week – odds and ends of things. Above is my current train tatting – still on the daisies, but this time pink. I just loaded up the shuttles with what looked like a sensible about of thread, and will carry on until it runs out. It’s lovely to tat like this – there’s a few onion rings in there as leaves (not shown above), and a few standard daisies as well. It’s just a bit of meandering about, no set pattern, which is quite nice for a change. I was thinking about getting some gauze, the kind people makes scarves from, and tatting an edging for it… I thought it could be a good ongoing project, perhaps?

Image

In stark contrast, here’s a new drawstring bag I made! For christmas I received an extremely generous gift – a voucher for the Make Lounge. I spent a long time thinking about the type of class I’d like to take, and in the end, decided on screen printing. I wanted something that would be fun, but that I could possibly do at home. (I thought long and hard about sewing, but classes are all taught on an electric machine, and it felt weird being unfaithful to my Singer!) Then of course, I needed to think of something to print, so drew a monkey, and some elephants:

Image

Now, the thing with this type of screen printing is that you have to cut it by hand — and we didn’t have time to do repeat patterns, and so I adapted the characters a little on the night. (I prefer the planned monkey, but went a bit nuts and cut it differently by accident!) 

Image

Unlike everyone else, I took some calico with me, and screen printed a couple of extra prints. I wasn’t too sure – I’m still not too sure – what to do with them, but once you’ve got the screen working, seems a bit nuts not to make the most of it. I pre-washed the calico, and flippin’ eck, it’s not easy to iron, is it? Yes, I DID iron it while it was still damp, but to no avail. Amusingly, I saw that Patch had the same issues last week.

Image

They gave as a little bag to screenprint, which you can see on the left. It’s really cute – child sized. I also have a tea towel with a monkey on each end.

It was a great evening – amazing how fast you can relax and forget about work and all your troubles when you have something fun to do! I’m not sure if I will screen print at home – does require space, and creates a lot of mess, but it did get me thinking about lino printing, which I’ve not done since college, and used to love. I know you can do that with a roller for the ink and the back of a spoon for a press, so we shall see…

Image 

And finally, I thought I’d use up a few scraps, and try a log cabin lavender bag. As you can see, this ended up rectangular rather than square as I decided it was getting too big. The patch with the ‘7685’ on it is the selvedge of the dotted fabric, which I quite like. It’s an odd little thing, but quite cute in real life. Now it lives in the monkey bag with the other scraps and makes them smell nice.

Hope you’re all having good weekends!